Running OTRS on FreeBSD
Florian Edlhuber21. May 2019 | ConsultingUse cases
Disclaimer:
The practical examples presented in our technical blog (blog.otrs.com) and now in the expert category in our FAQ blog section serve as a source of ideas and documentation to show what is theoretically possible with OTRS in concrete scenarios or sometimes even for more exotic configurations. All configurations presented here were developed under laboratory conditions as a proof of concept.
We can only guarantee testing and implementation of these concepts to be error-free and productive if implemented in a workshop with one of our OTRS consultants. Without this, the responsibility lies with the customer himself. Please note that configurations from older OTRS versions may not work in the newer ones.
FreeBSD is an open source UNIX®-like operating system that runs on several platforms. It is available free-of-charge to companies around the world under the standard BSD license. This means that companies have the option of distributing work that they’ve created based on FreeBSD without including the source code, if they chose to.
While “free” is certainly a compelling reason for technology professionals to leverage FreeBSD, there are even greater technological advantages to its use. The OS includes mature base code that has been consistently enhanced for more than 20 years by its extensive community. FreeBSD focusses on features, speed, and stability: It performs smoothly under heavy loads and efficiently manages memory; employs modern security features, like firewalls and jails; incorporates all modern networking protocols; and is relatively easy to administer.
Given its cost (or lack of) as well as its focus on stability and security, FreeBSD has become widely used by technology professionals in a wide variety of disciplines. It can handle nearly any task, from servers and desktops to embedded and appliance applications, without any perceivable degradation of speed. Because of its wide-spread use, it is important for OTRS 7 to run smoothly on FreeBSD.
The following outlines how to install OTRS 7 on FreeBSD. Additional details can be found in the official OTRS installation manual on doc.otrs.org.
OTRS 7 Installation on FreeBSD
For this installation, we use Apache2 and MySQL. At a minimum, you will need a FreeBSD installation with a working network connection. We use ports and do not compile on our own; we use pkg to keep things simple.
Step 1: Start with the Ports
Logon with your root account, fetch the portsnap,
root@freebsd:/ # portsnap fetch && portsnap extract
and compile pkg.
root@freebsd:/ # cd /usr/ports/ports-mgmt/pkg/ && make install clean
If needed, convert it into:
root@freebsd:/ # pkg2ng
Now you can create a user in the group wheel.
root@freebsd:/ # adduser
root@freebsd:/ # pw groupmod wheel -m
Then create the /opt/ directory,
root@freebsd:/ # mkdir /opt
and fetch the latest ports.
root@freebsd:/ # portsnap fetch update
Step 2: Install Apache2
Now you have to install Apache2.
root@freebsd:/ # pkg install apache24
To run Apache HTTP Server from startup, add apache24_enable=”yes” in your /etc/rc.conf. This can be done manually or with sysrc apache2_enable=yes.
Start the webserver to begin the test.
root@freebsd:/ # service apache24 start
Step 3: Install the MySQL Database
If steps one and two are working, you can install the database next. In this case, we are using MySQL.
root@freebsd:/ # pkg install mysql57-server
To run MySQL from startup, add mysql_enable=”yes” in your /etc/rc.conf. This can be done manually or with sysrc mysql_enable=yes
Step 4: Install the Packages
The Perl packages are tricky, but they can easily found with
pkg search | grep p5
Via command, you can install the packages you need.
root@freebsd:/ # pkg install ap24-mod_perl2 p5-CryptX p5-Archive-Zip p5-Digest-Bcrypt p5-Crypt-SSLeay p5-DateTime p5-DBD-mysql p5-EV p5-JSON p5-JSON-XS p5-Moose p5-DBD-LDAP p5-Net-DNS p5-Template p5-Search-Elasticsearch p5-YAML p5-YAML-LibYAML p5-libxml p5-XML-LibXML p5-XML-XSLT p5-XML-LibXSLT p5-Text-CSV_XS p5-Template-Toolkit
If you miss modules, you can install them via cpan.
root@freebsd:/ # cpan Date::Format
Depending on the installation, if the Perl path is not recognized, then a symbolic link may be helpful.
root@freebsd:/usr/bin # ln -s /usr/local/bin/perl perl
Step 5: Adding OTRS Configurations
Now create an OTRS user.
root@freebsd:/ # adduser otrs
And activate Apache modules in
/usr/local/etc/apache24/modules.d/260_mod_perl.conf
Then enable the mod_perl
LoadModule perl_module libexec/apache24/mod_perl.so
in
/usr/local/etc/apache24/httpd.conf
And enable the proxy modules
LoadModule proxy_module libexec/apache24/mod_proxy.so
LoadModule proxy_http_module libexec/apache24/mod_proxy_http.so
LoadModule proxy_wstunnel_module libexec/apache24/mod_proxy_wstunnel.so
Now configure the Apache conf file
root@freebsd1:/usr/local/etc/apache24/extra:/# ln -s /opt/otrs/scripts/apache2-httpd.include.conf ./zzz_otrs.conf
and include the file in /usr/local/etc/apache24/httpd.conf
Include etc/apache24/extra/zzz_otrs.conf
Then, try to start Apache with the new configuration
root@freebsd:# apachectl restart
Note: be sure to test your current setup. If you browse to your /otrs/index.pl, then an error will occur, but the error is fine at this point.
The error message:
“Service Unavailable
The server is temporarily unable to service your request due to maintenance downtime or capacity problems. Please try again later.”
At this point, it is OK to continue with your installation steps and set file permissions
root@freebsd:# perl /opt/otrs/bin/otrs.SetPermissions.pl –admin-group=wheel
Now install Elasticsearch
root@freebsd: # pkg install elasticsearch6 p5-Search-Elasticsearch
root@freebsd: # /usr/local/lib/elasticsearch/bin/elasticsearch-plugin install –batch ingest-attachment
root@freebsd: # /usr/local/lib/elasticsearch/bin/elasticsearch-plugin install –batch analysis-icu
And enable Elasticsearch in /etc/rc.conf.
elasticsearch_enable=”YES”
Then start the service.
root@freebsd: # service elasticsearch start
Wait several seconds and then test the connection.
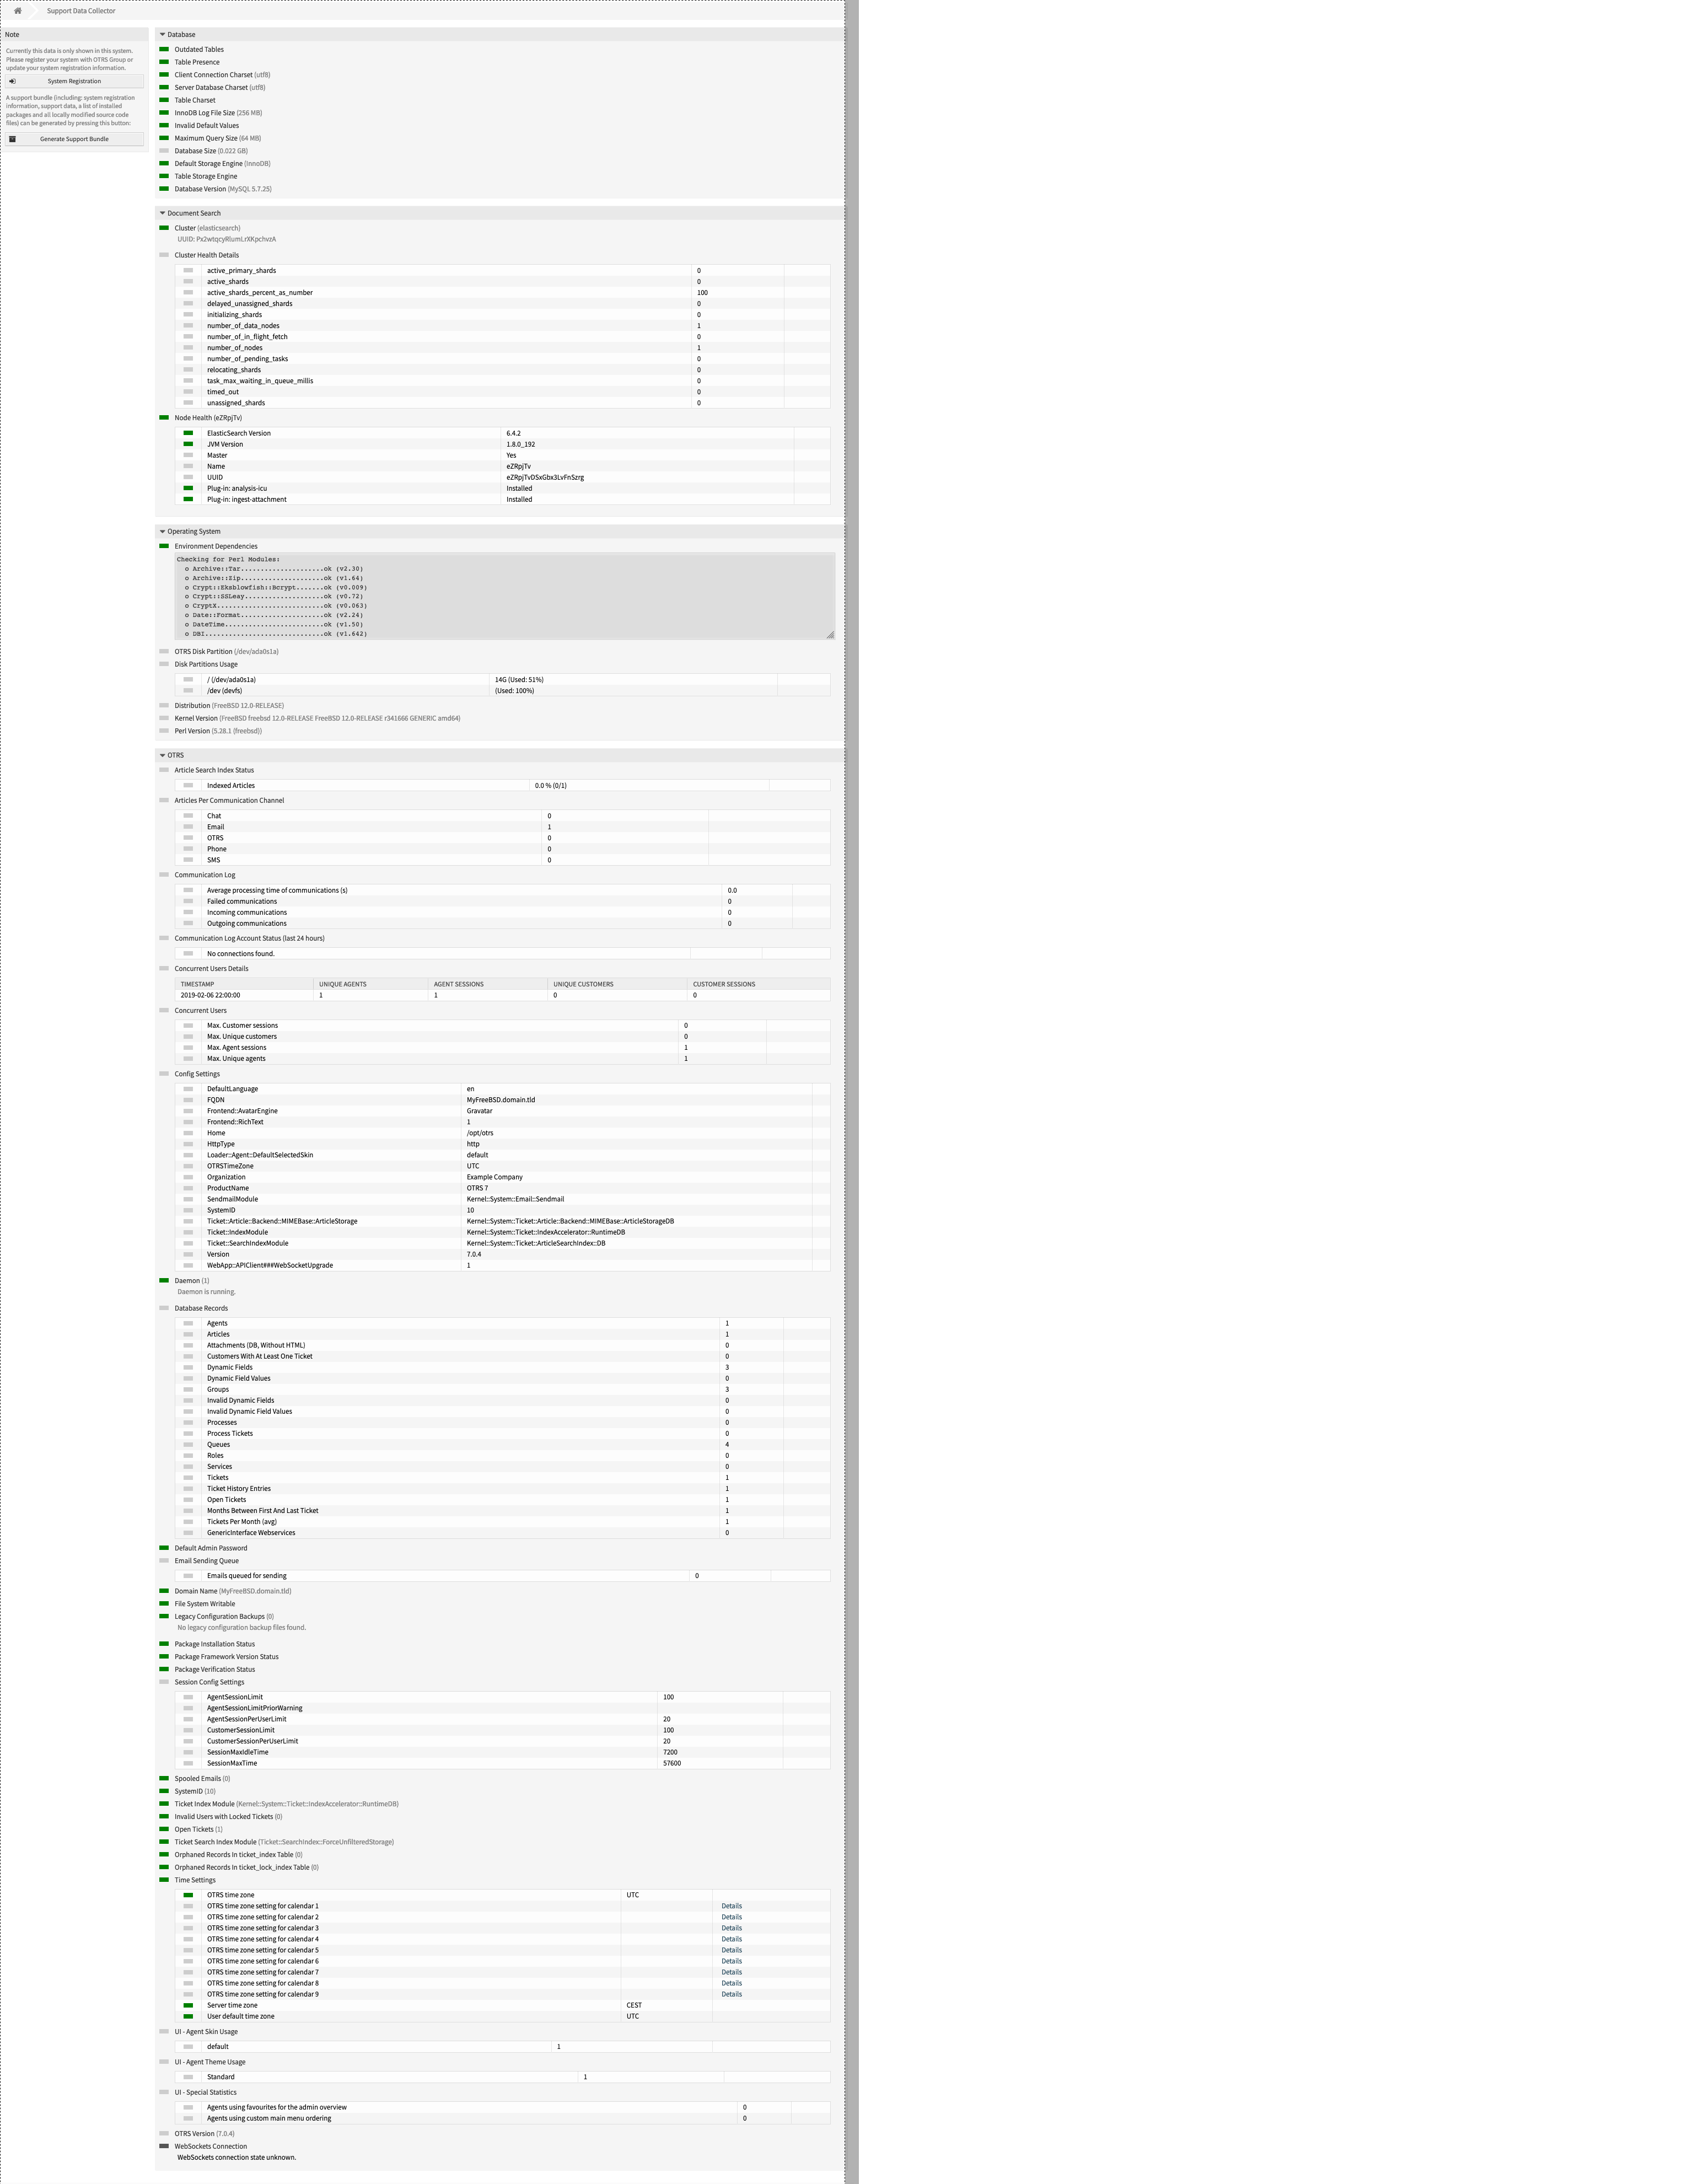
[otrs@freebsd ~]$ /opt/otrs/bin/otrs.Console.pl Maint::DocumentSearch::Check
The connection should be successful and the following message should appear:
Getting cluster information…
+———+————————+
| Cluster | elasticsearch |
| UUID | Px2wtqcyRlumLrXKpchvzA |
| Status | Green |
+———+————————+
Getting nodes information…
+———————–+————————+
| Node | eZRpjTv |
| UUID | eZRpjTvDSxGbx3LvFnSzrg |
| Master | Yes |
| Elasticsearch version | 6.4.2 |
| JVM version | 1.8.0_192 |
| Required Plug-ins: | |
| analysis-icu | Installed |
| ingest-attachment | Installed |
| Status | On-line |
+———————–+————————+
The database is set up identically to all other Linux distributions. If you need additional help with the database setup, visit:
https://doc.otrs.com/doc/manual/installation/stable/en/content/installation.html#mysql-or-mariadb
Step 6: Finishing Up
Finally, install Python and NPM. Update the NPM.
root@freebsd: # pkg install openjdk
root@freebsd: #npm install -g npm@latest
When you have finished, restart the webserver. As a final step, check the Support Data Collector:
Running FreeBSD is appealing, affordable and accessible for all, and it certainly won’t get in your way of using OTRS. The six steps above offer a high-level overview of how to run OTRS on FreeBSD, but if you have any difficult or are interested in more detailed instructions, review the official OTRS installation documentation at: