HowTo: Connect OTRS with Alfresco (Part 2)
Robert Ullrich20. Oct 2017 | ConsultingUse cases
Disclaimer:
The practical examples presented in our technical blog (blog.otrs.com) and now in the expert category in our FAQ blog section serve as a source of ideas and documentation to show what is theoretically possible with OTRS in concrete scenarios or sometimes even for more exotic configurations. All configurations presented here were developed under laboratory conditions as a proof of concept.
We can only guarantee testing and implementation of these concepts to be error-free and productive if implemented in a workshop with one of our OTRS consultants. Without this, the responsibility lies with the customer himself. Please note that configurations from older OTRS versions may not work in the newer ones.
Let’s continue with our AlfrescoConnector. Last time I showed you how to manage sites and folders in Alfresco. Today I will show you how to create files and additional users and how to modify them.
To complete this how-to, you need at first a running OTRS and an Alfresco system. For some operations, you need special privileges in Alfresco (e.g. administrator privileges). The REST/JSON API of Alfresco is activated by default.
Use case for this connector
Probably you already know Alfresco. It’s one of the best Open Source document management system. The AlfrescoConnector can be useful for companies who are sending documents to their customers via OTRS and have to upload them to Alfresco. To improve this workflow and to prevent agents from manually uploading documents to Alfresco, you can use the connector of this article.
OTRS Requirements for this HowTo
OTRS Framework
- at least OTRS 5.0.x
OTRS Packages
You need the following Freely selectable Features of the OTRS Business Solution™ 5s :
- OTRSGenericInterfaceInvokerTicket
(Adds new invoker for TicketCreate and TicketUpdate in the GenericInterface.)
- OTRSGenericInterfaceInvokerEventFilter
(Contains additional functionalities to add conditions to events of invokers.)
Third Party Software
You need this third-party software:
- XML::Simple
- XML::LibXML
- XML::LibXSLT
DynamicFields
The following dynamic fields should be added because they’re required by Alfresco
- “AlfrescoUserID” of type “TEXT” to specify the login of the new user
- “AlfrescoUserFirstName” of type “TEXT” for the first name of the new user
- “AlfrescoUserLastName” of type “TEXT” for the last name of the new user
- “AlfrescoUserEMail” of type “TEXT” to specify a valid E-Mail address
- “AlfrescoUserInitialPassword” of type “TEXT” for the initial password
- “AlfrescoUserEnabled” of type “DROPDOWN” to store the response of Alfresco
- please use the following values:
- true: true
- false: false
- please use the following values:
- “AlfrescoFileName” of type “TEXT”
- “AlfrescoFileID” of type “TEXT” to store the file id of the response
Web service
In addition, part 1 of the AlfrescoConnector might be useful. You’ll find the first blog article here.
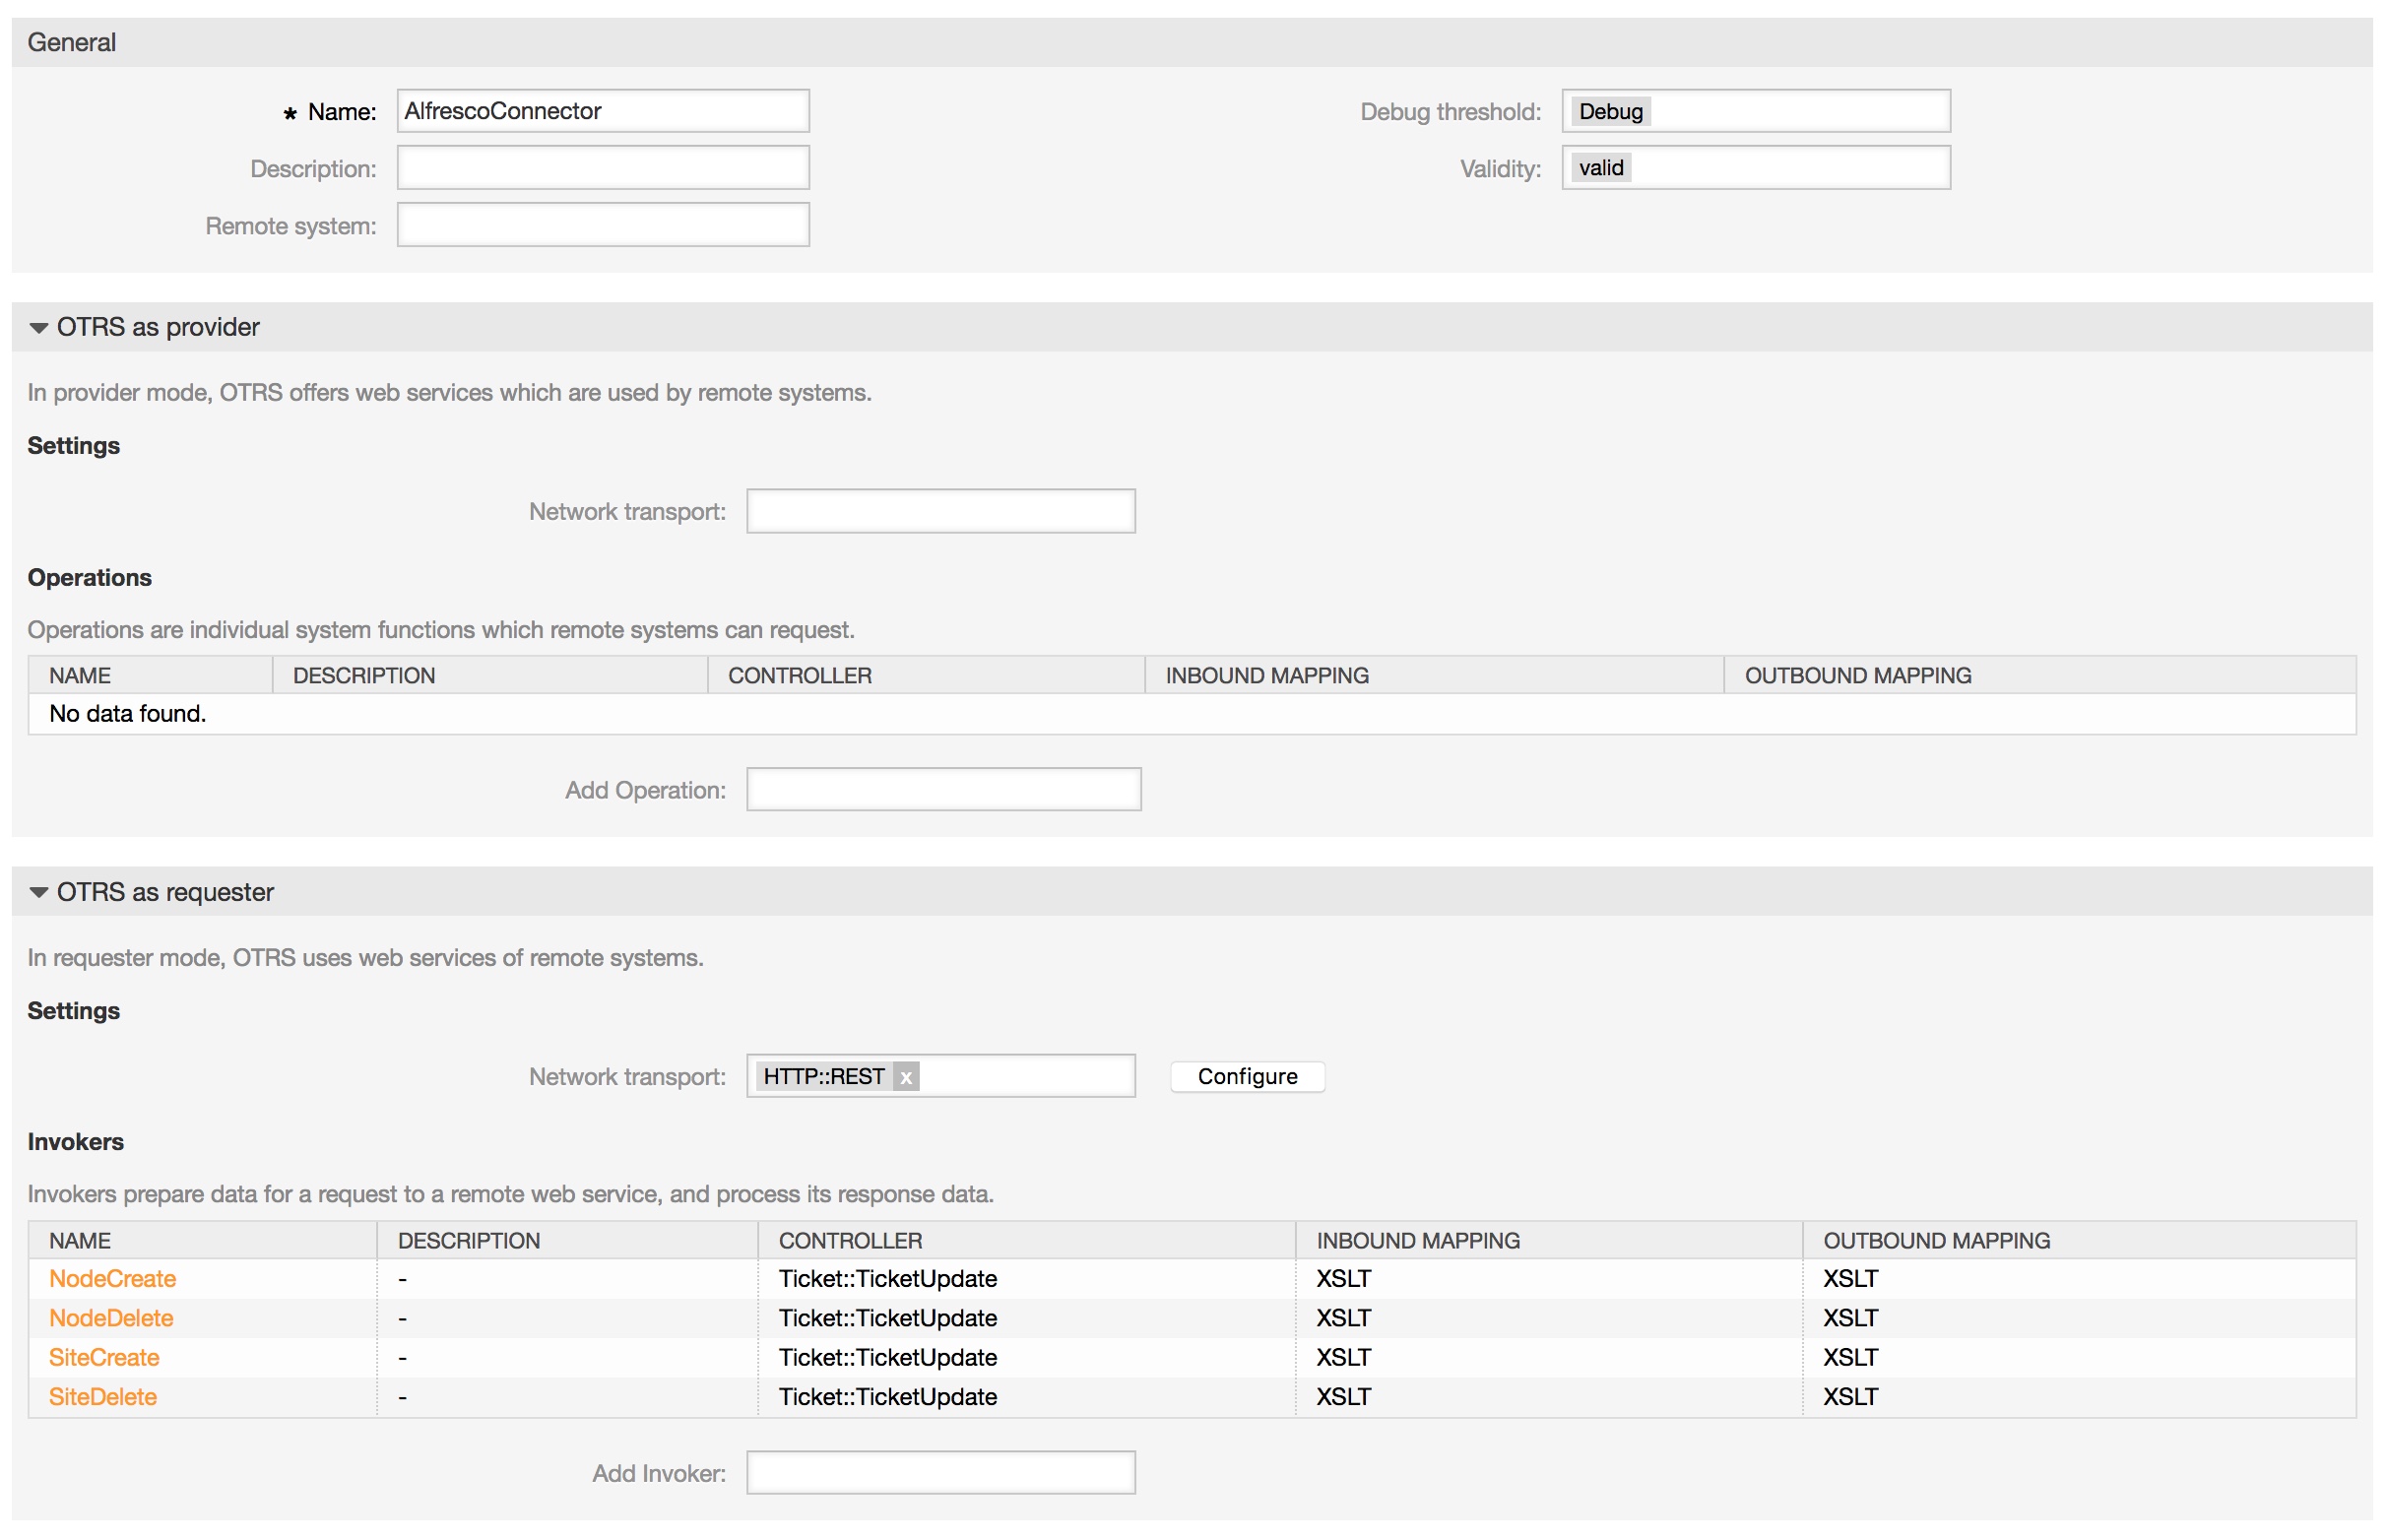
Configuring the AlfrescoConnector in OTRS
Now we can continue with the configuration of the web service. If you skipped the first article, please create a new web service called “AlfrescoConnector”. Afterwards, you have to set up the needed invokers.
Configuring the Invoker “UserAdd”
Now you’re ready to start the configuration of the Invokers. At first, we’ll create an Invoker for adding new sites to Alfresco. Set up an Invoker called “UserCreate” and select all the needed data for your outgoing requests and use “XSLT” as mapping for your outgoing and incoming response data.
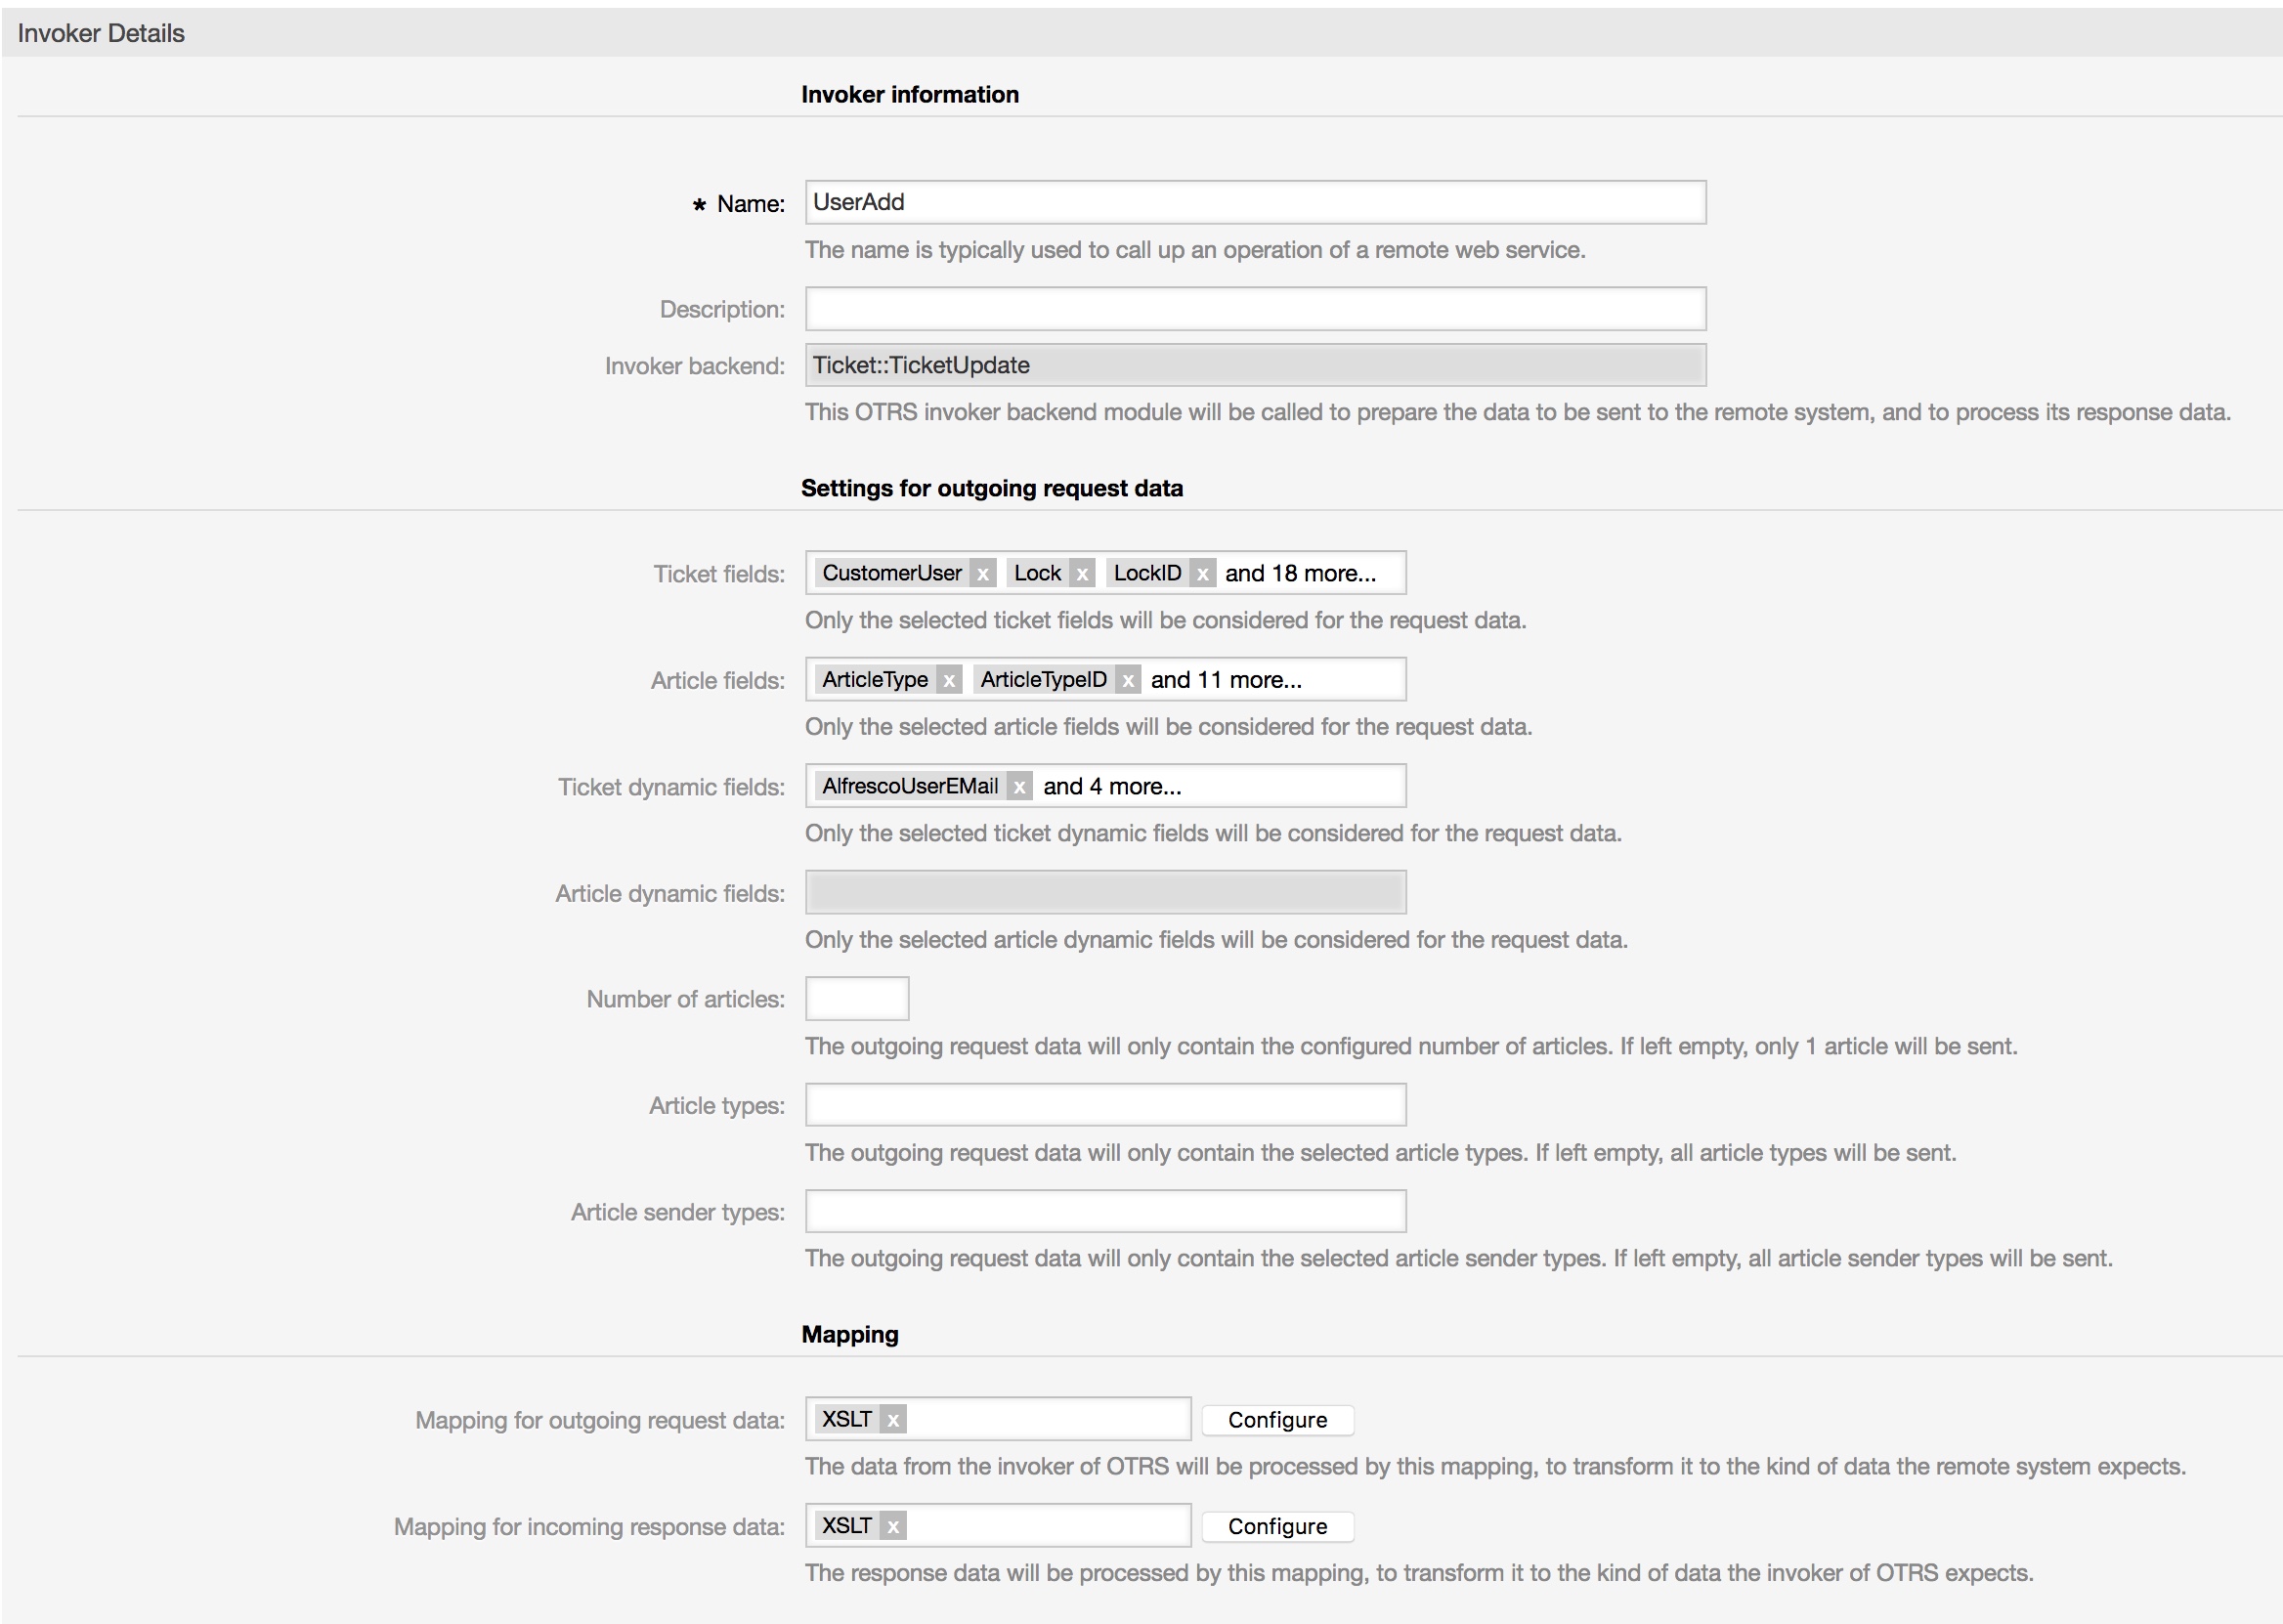
For the incoming response data, you have to select the dynamic field “AlfrescoUserEnabled”, which you created before.

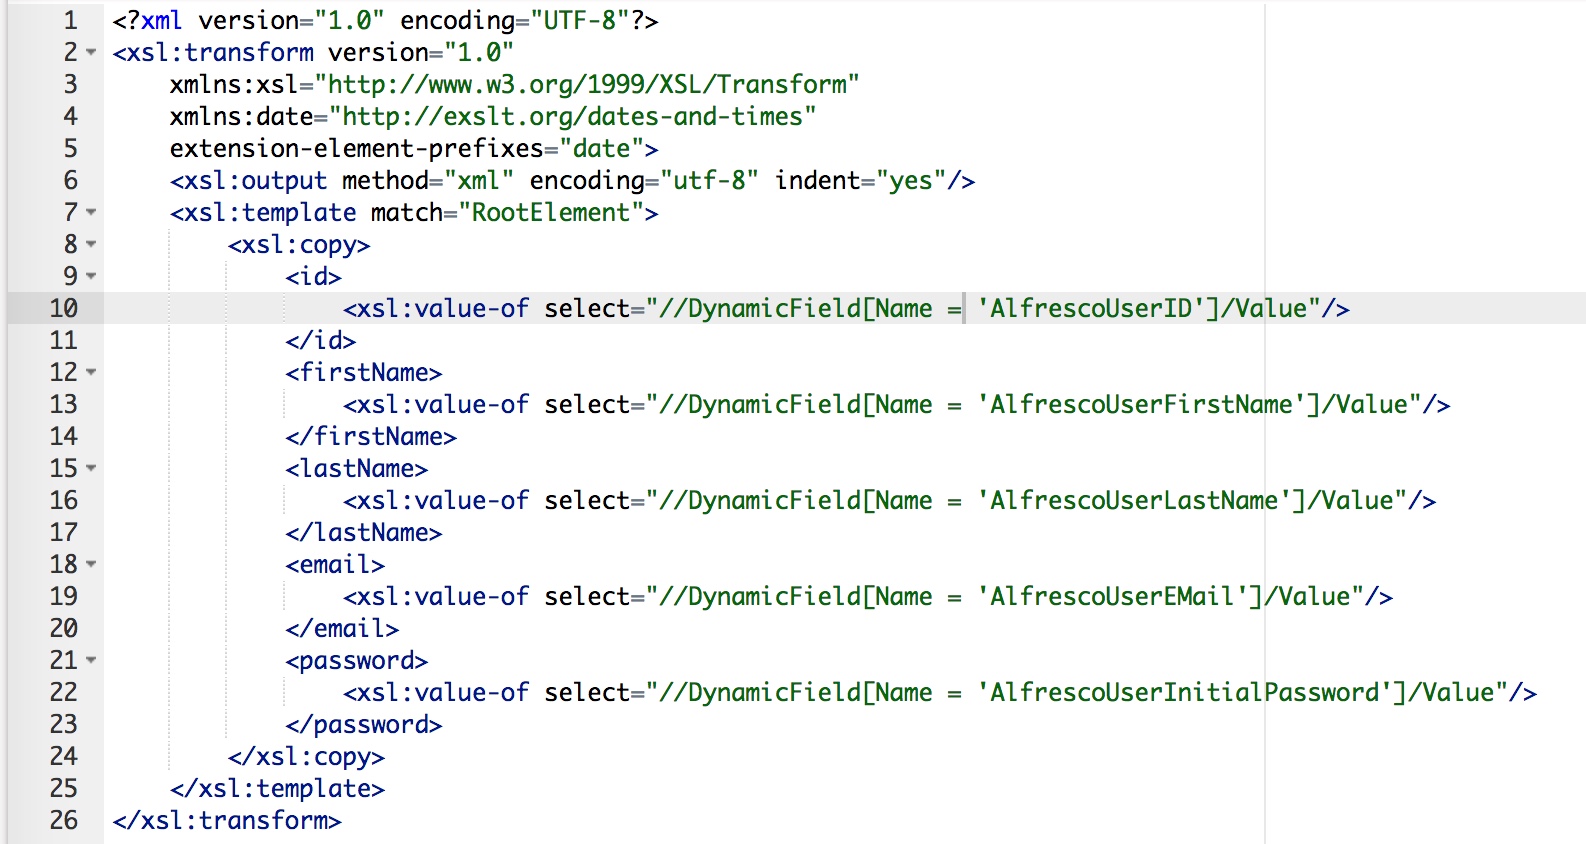
Now you can configure your outgoing XSLT-mapping. If you need a working XSLT-mapping, you can use the following example:
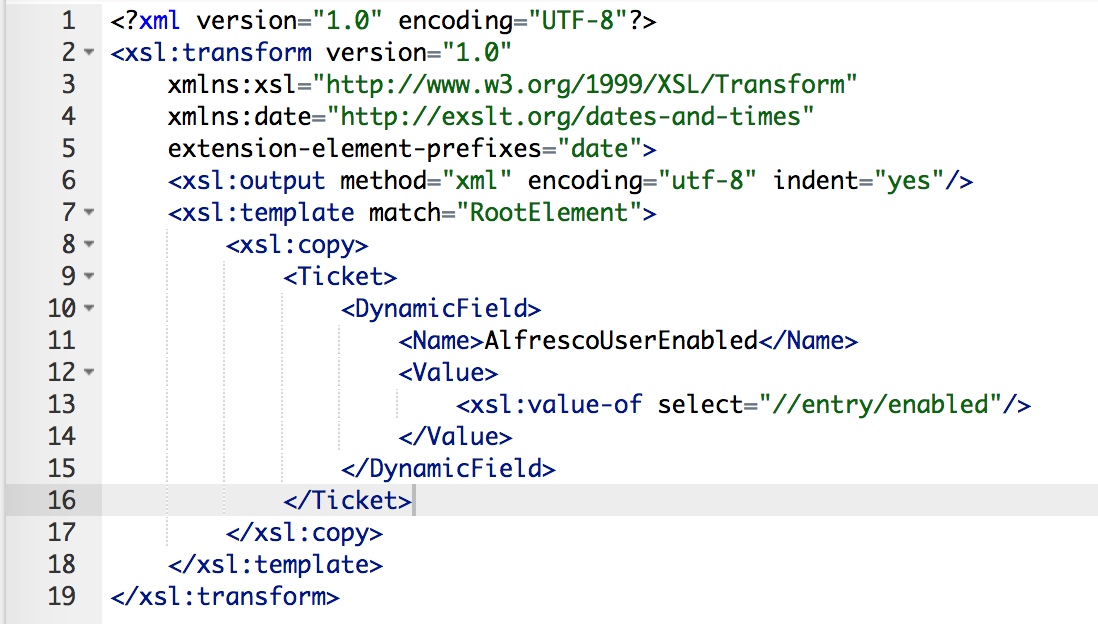
You also need an XSLT-mapping for the incoming response data, because we want to store the user ID:
The used “Event trigger” is the last point for this invoker. Just select one and you’re done with the first Invoker.
Configuring the Invoker “UserMod”
The next invoker is “UserMod”. Select all the needed data for your outgoing requests (please don’t forget the dynamic fields “AlfrescoUserID” & “AlfrescoUserEnabled in the “Ticket dynamic fields” drop-down) and use “XSLT” as a mapping for your outgoing data.
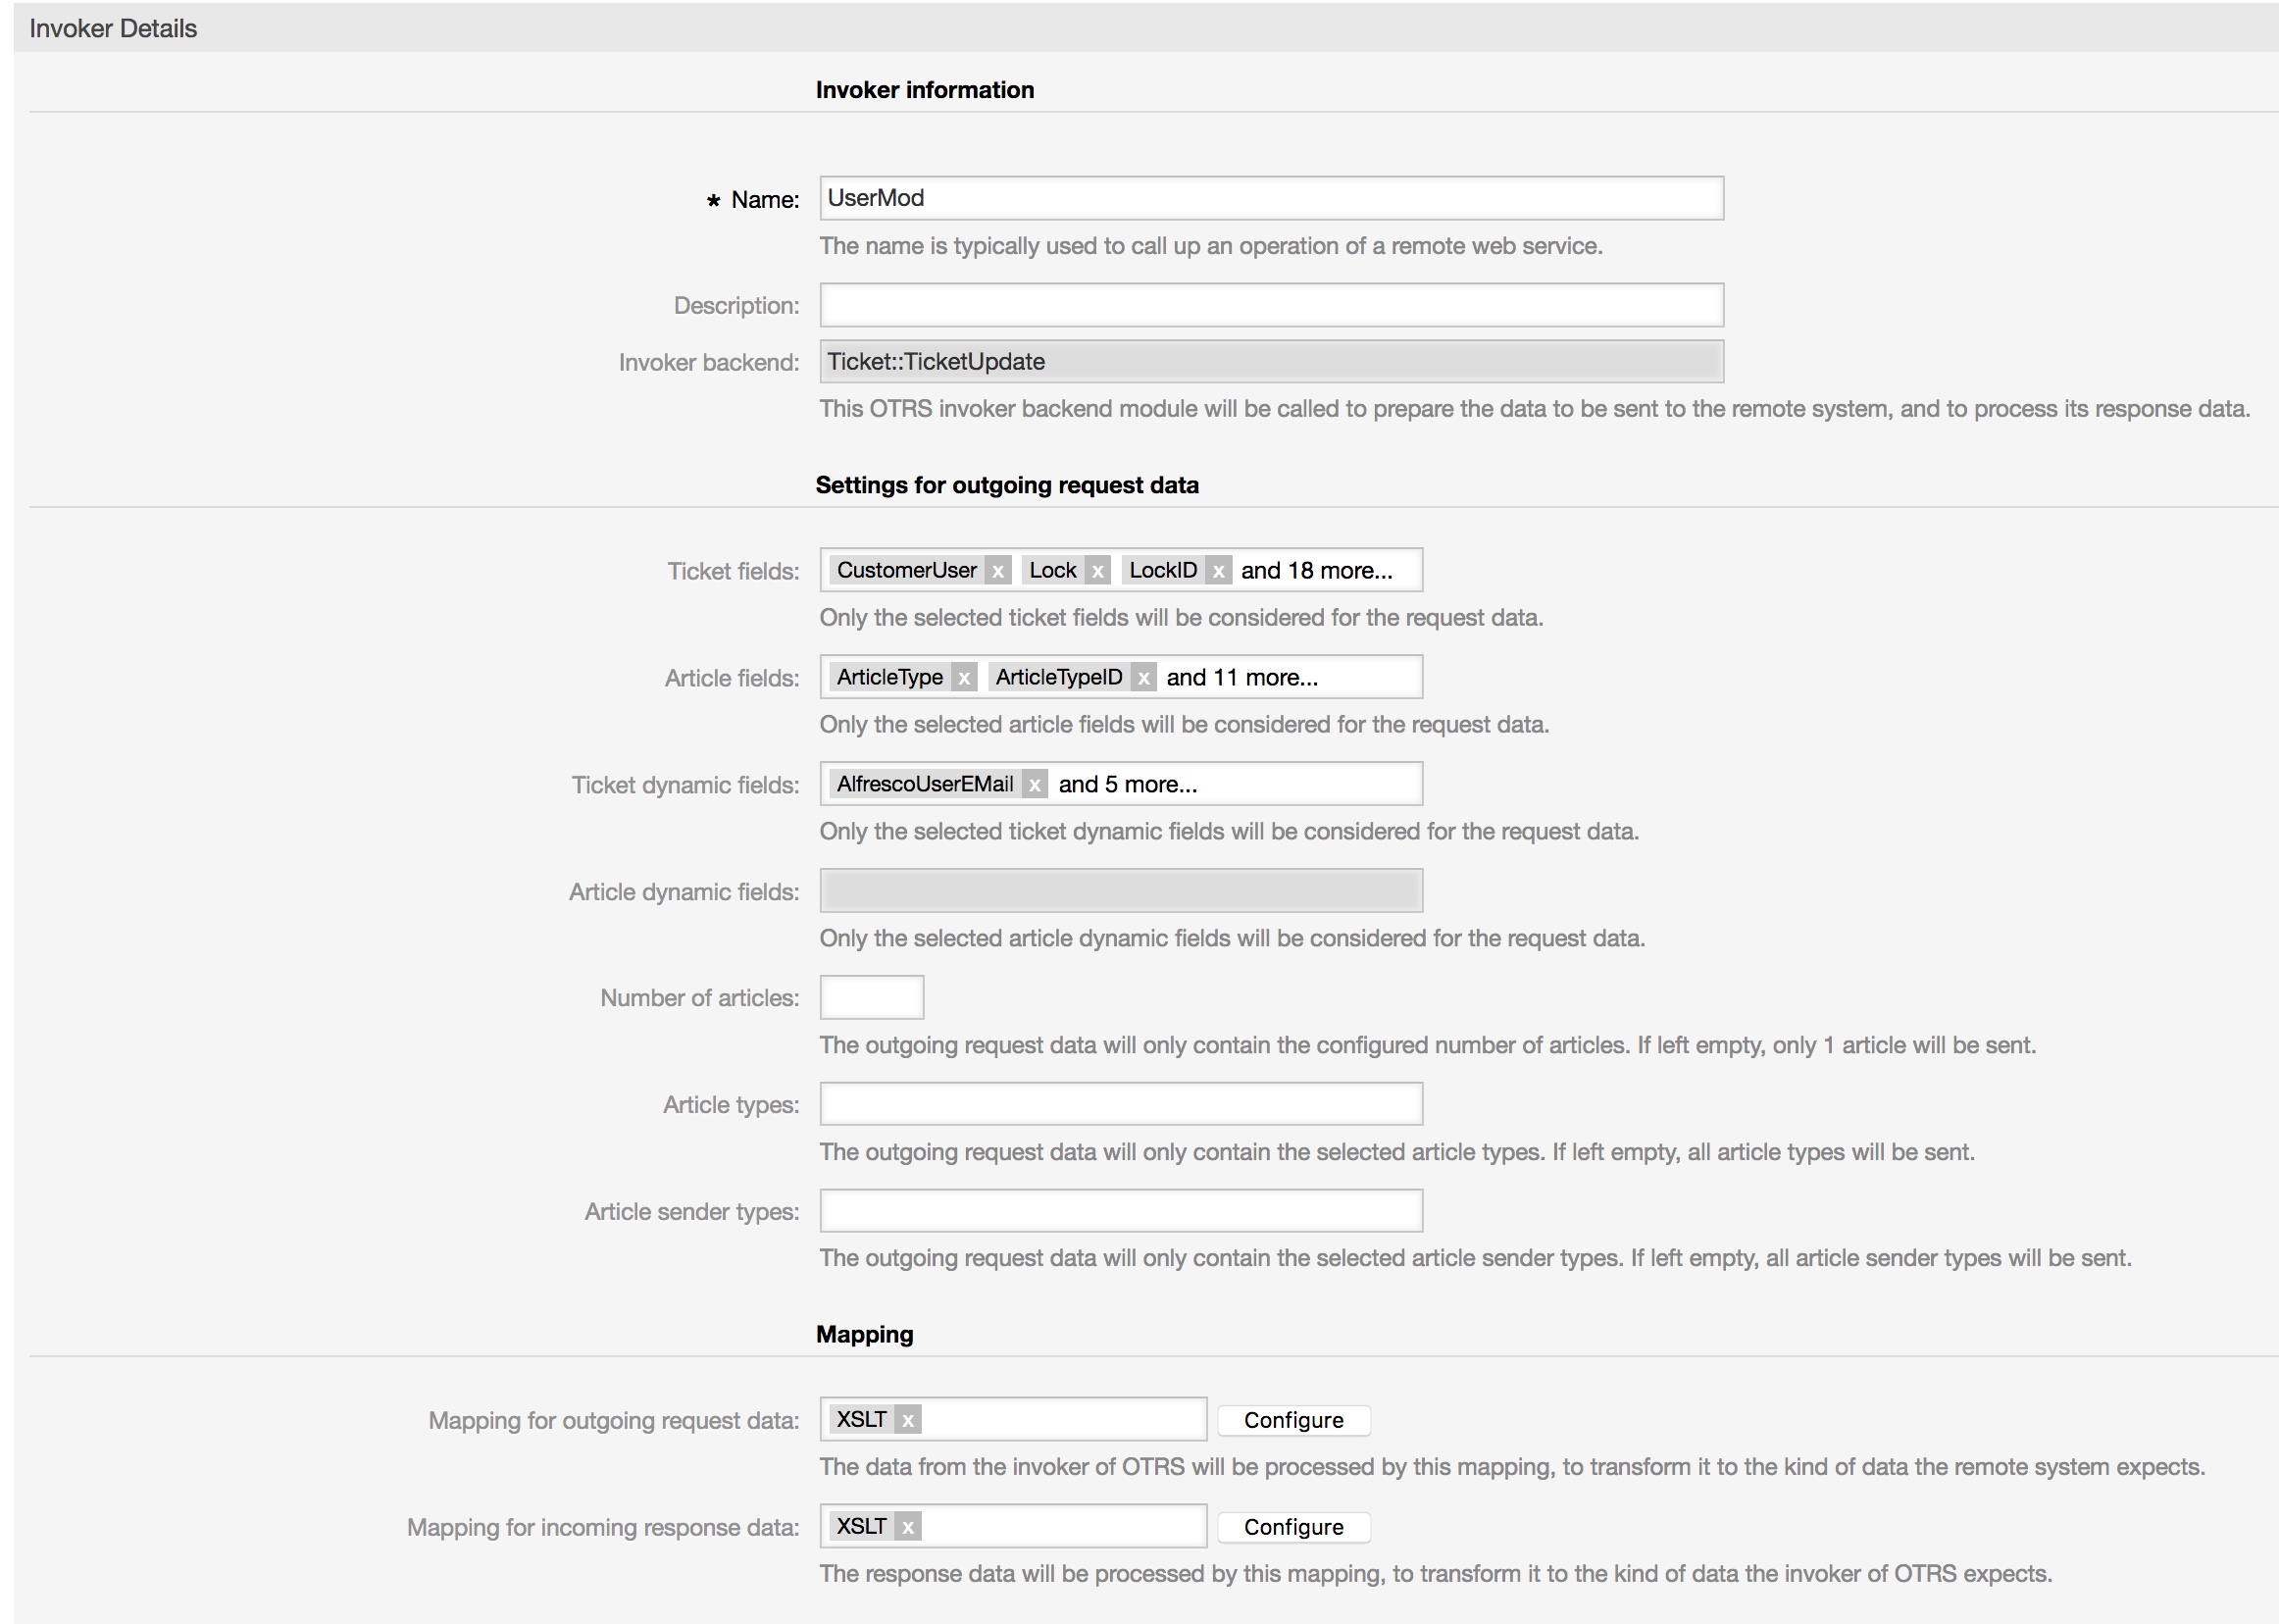
As outgoing XSLT-mapping, you can use my example.

A mapping for the incoming response data is not necessary because Alfresco sends an empty response.
The used “Event Trigger” is the last point for this Invoker. Just select one and you’re done with the second Invoker. In my example, I’m using a “TicketUnsubscribe” Event.

Configuring the Invoker “FileCreate”
The next Invoker is “FileCreate”. Select all the needed data for your outgoing requests and use “XSLT” as a mapping for your outgoing request and incoming response data.
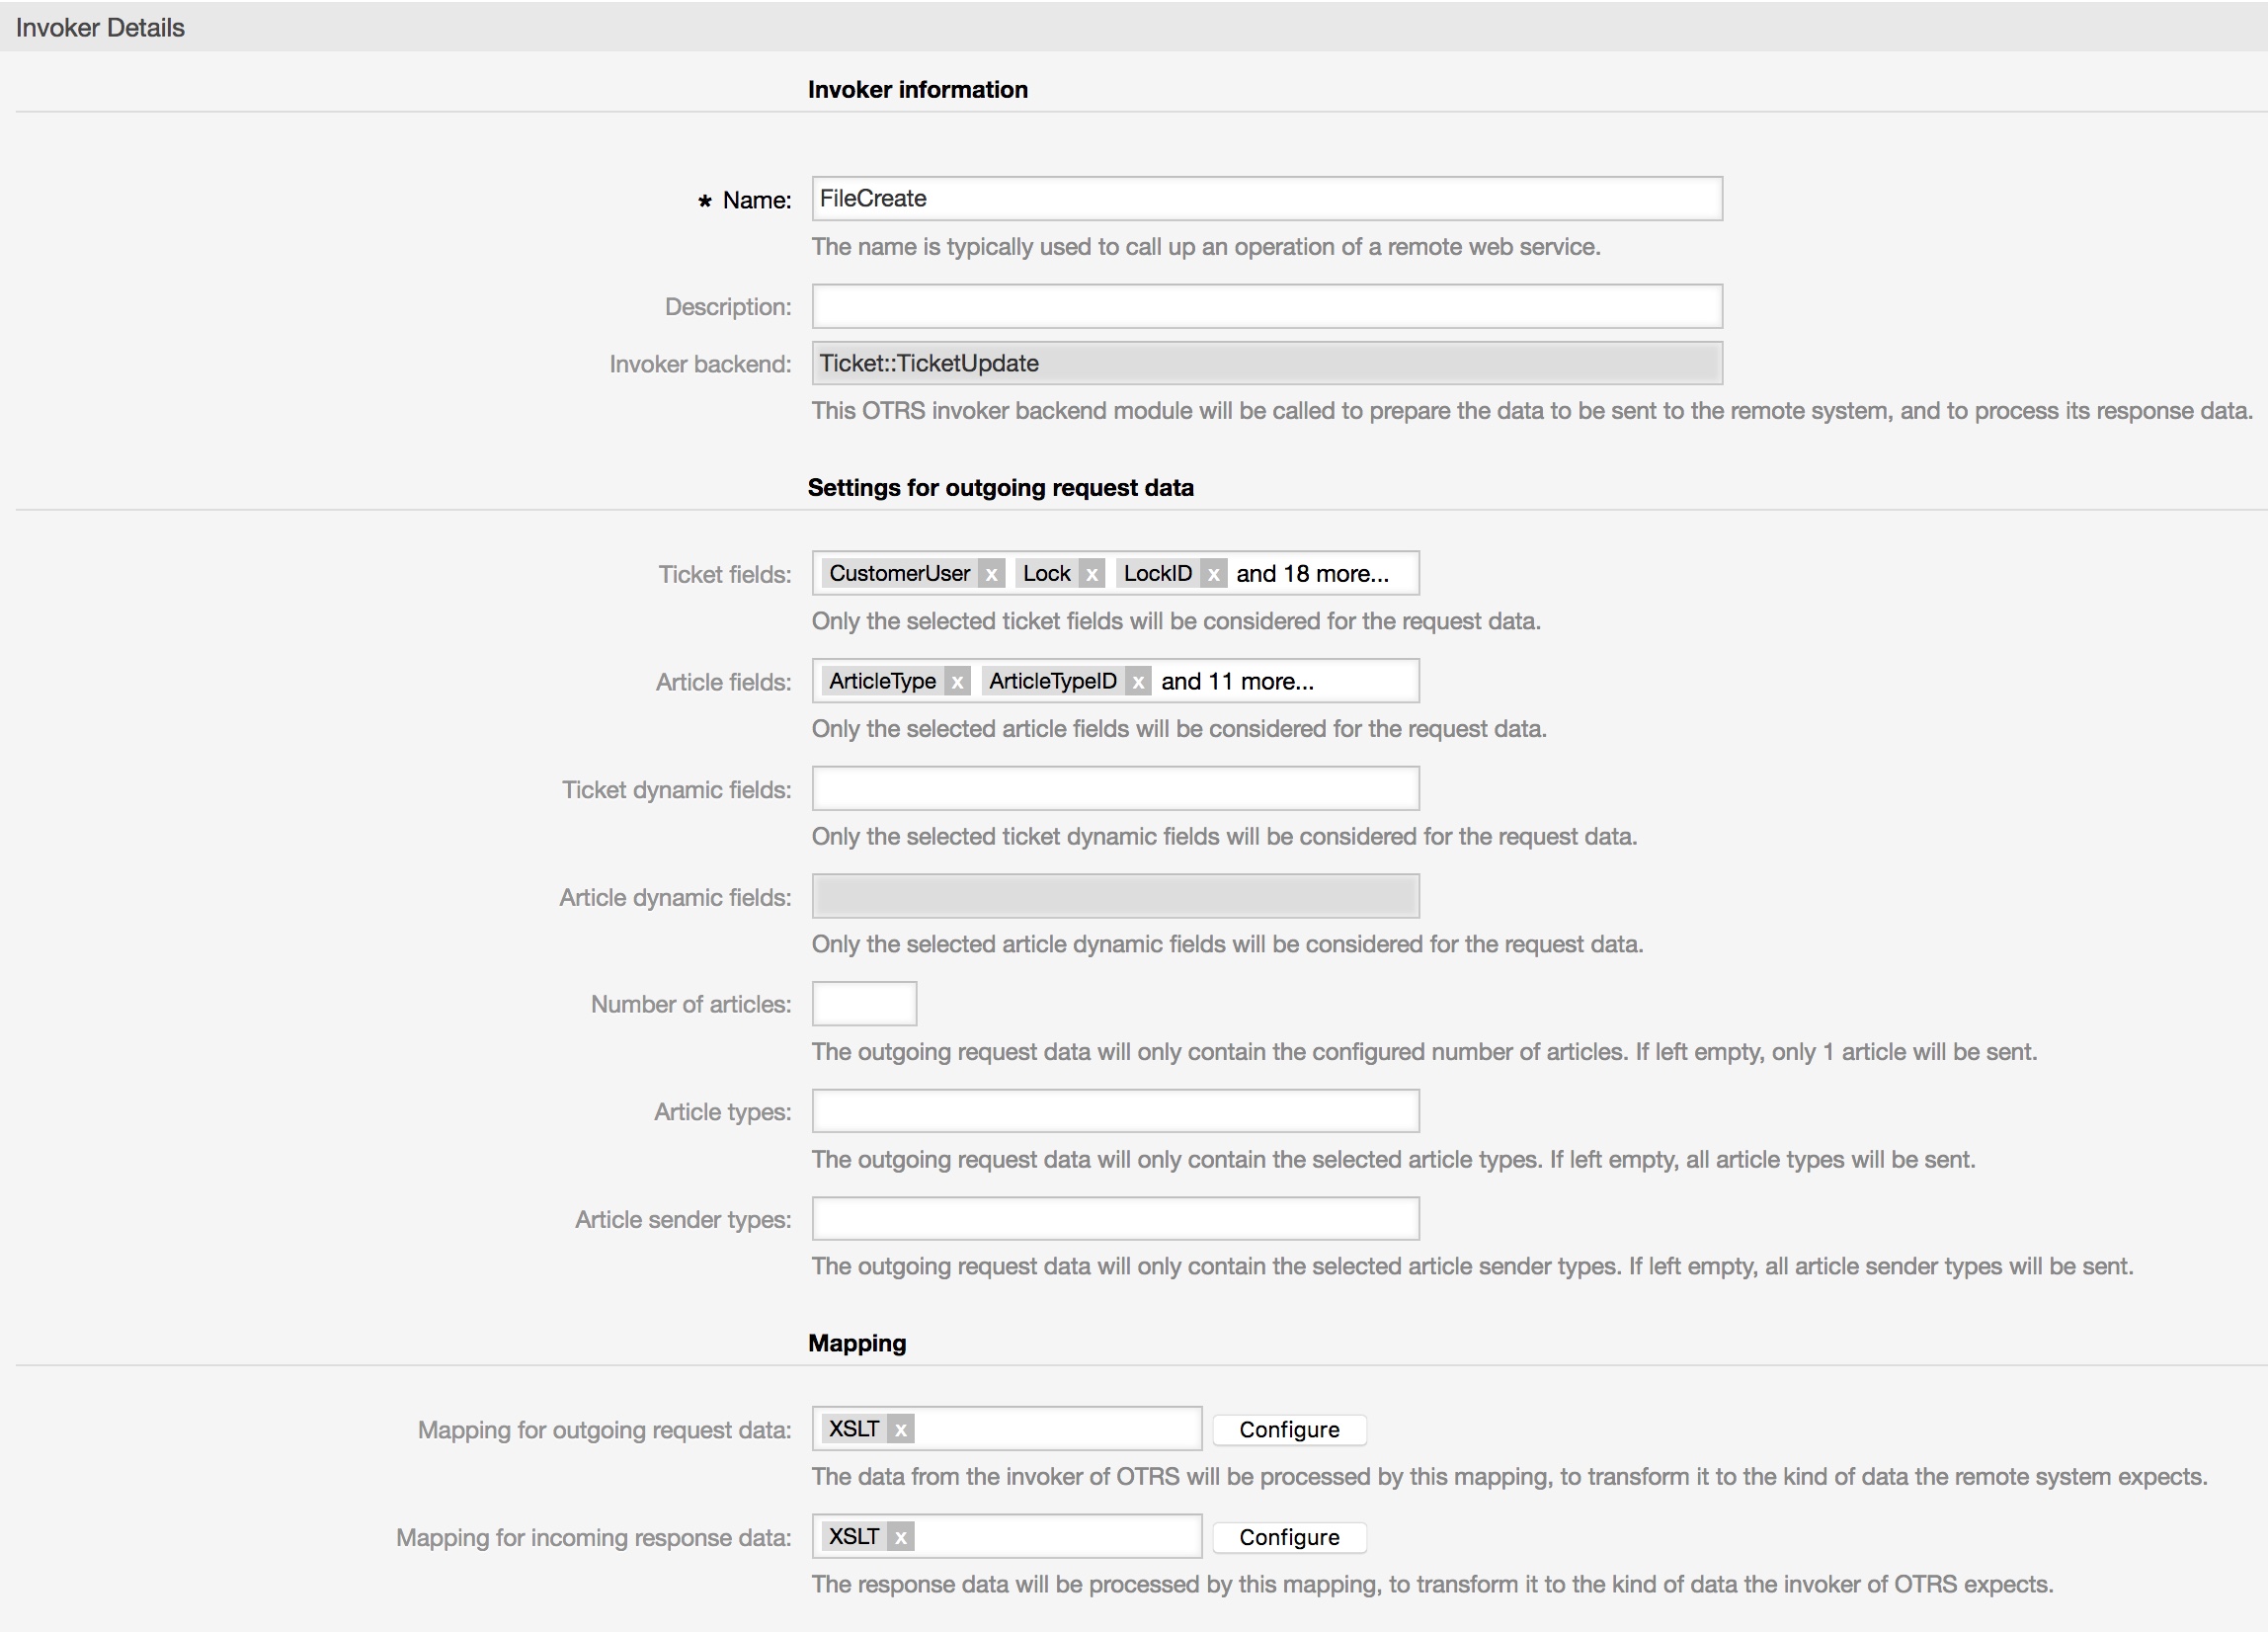
Use my example as outgoing XSLT-mapping:

Furthermore, we want to store the FileID of the response, for that reason we have to use the following mapping for incoming response data:
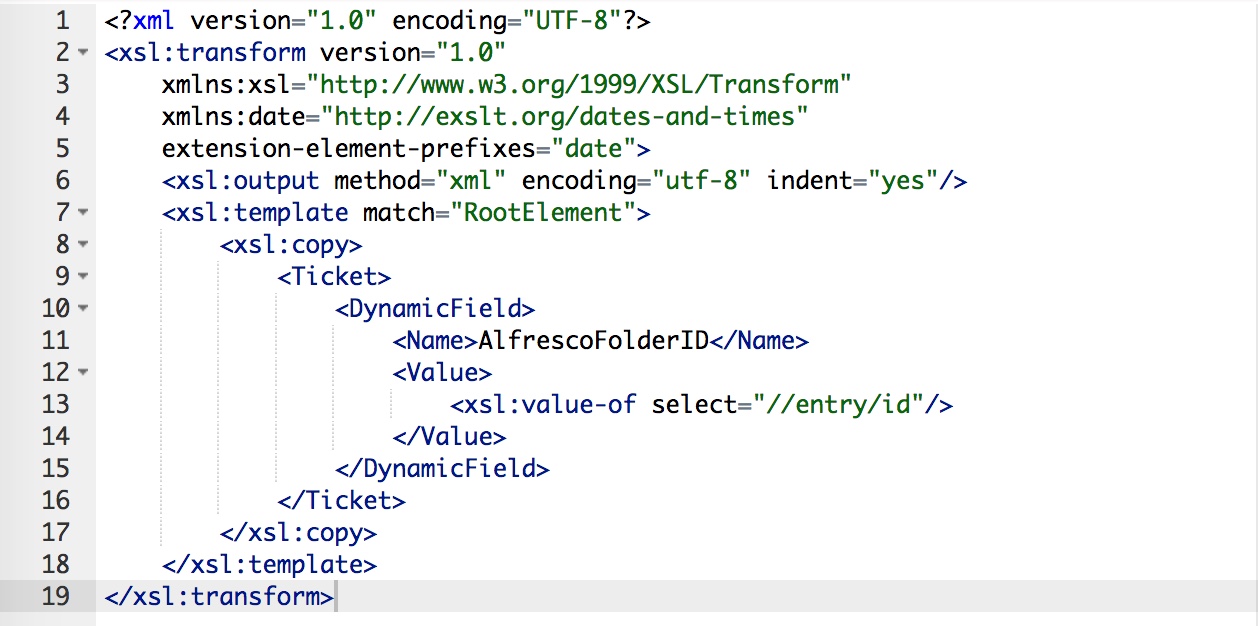
This mapping stores the FileID in the dynamic field “AlfrescoFileID”.
The last point for this Invoker is the “Event trigger”. Select one and you’re done with the next Invoker.
Configuring the Invoker “FileDelete”
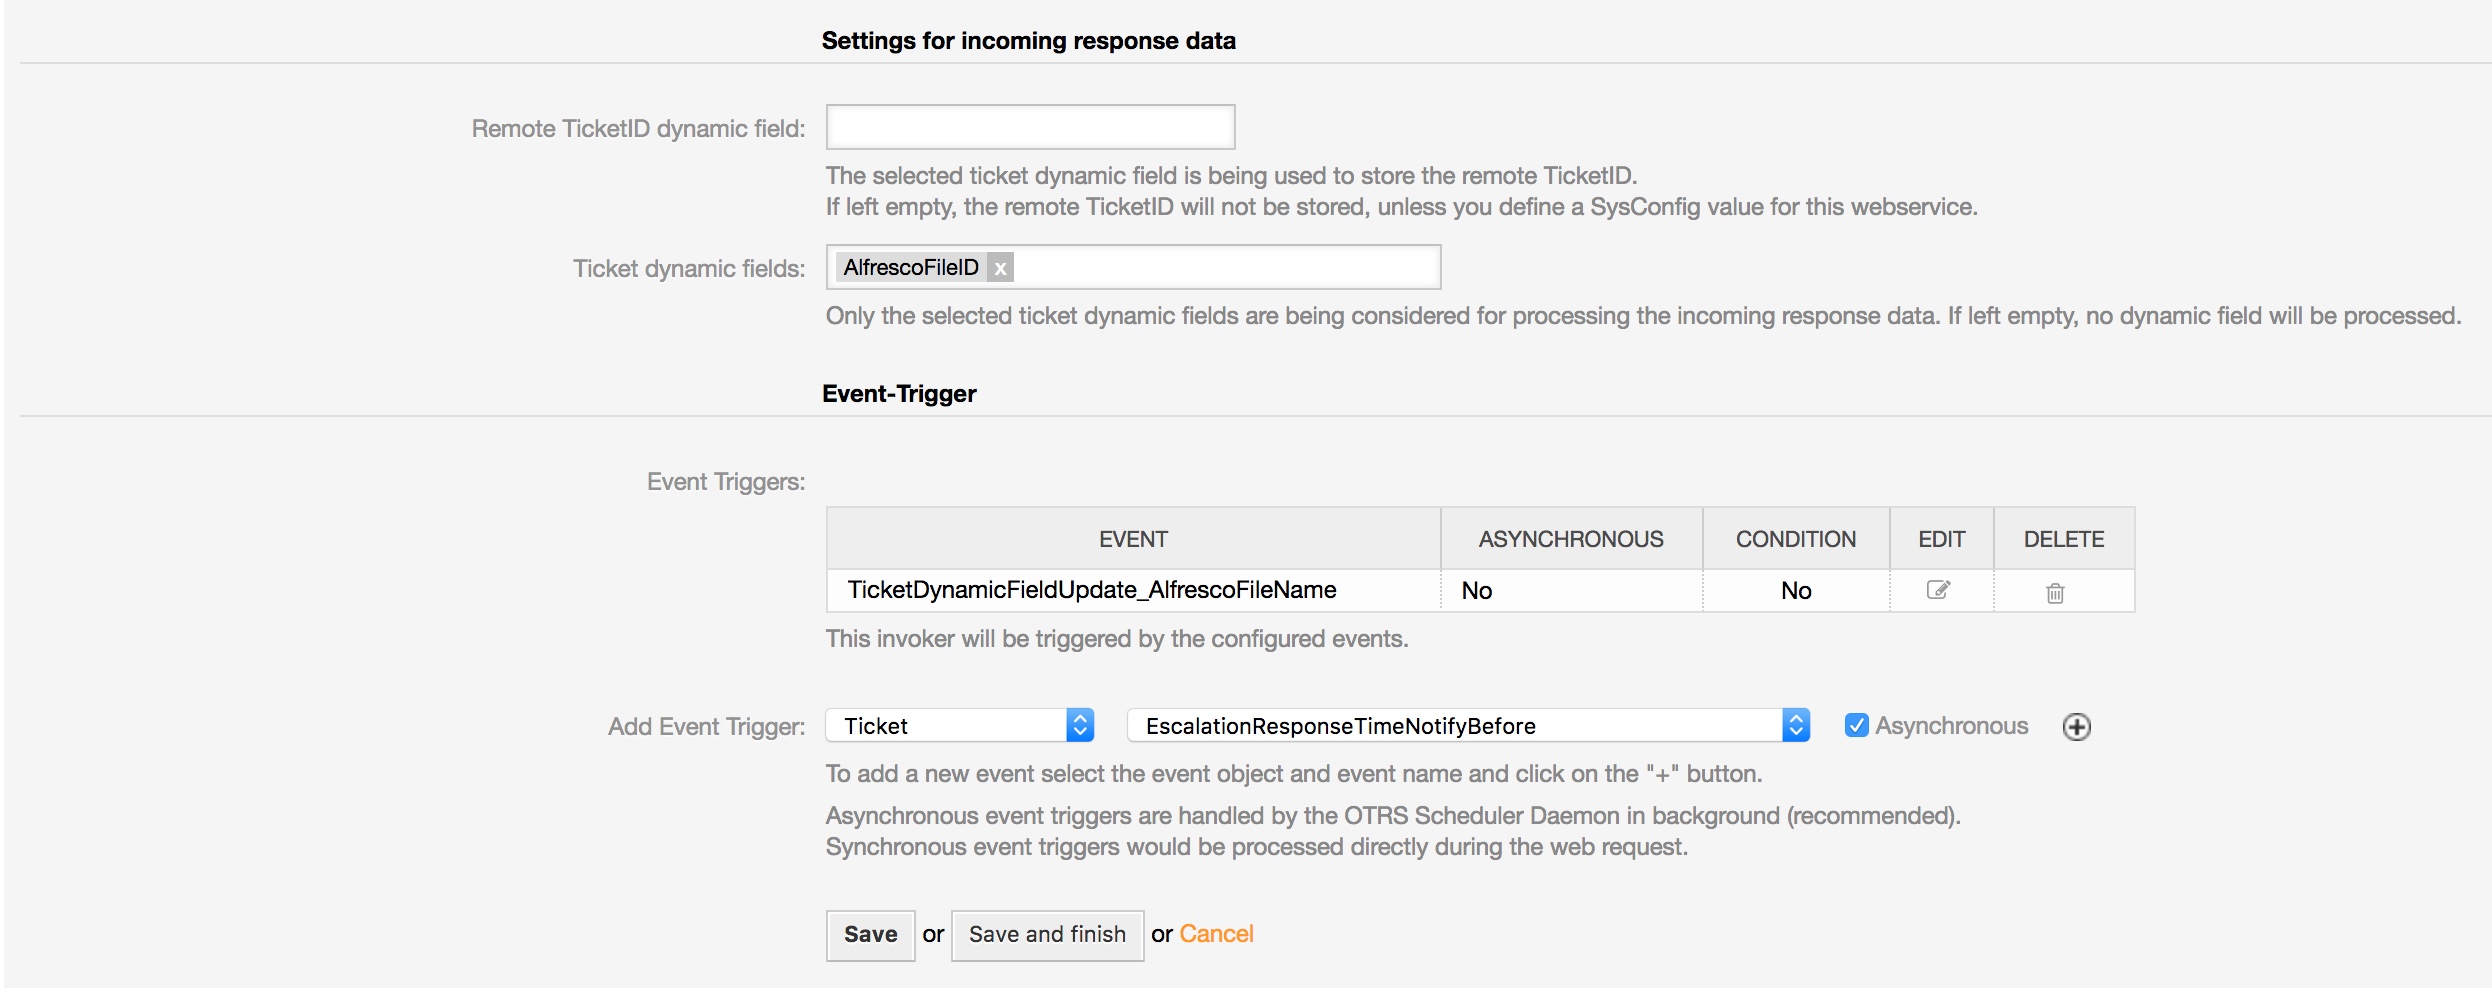
The last Invoker for today is “FileDelete”. Select all the needed data for your outgoing requests (please don’t forget the dynamic field “AlfrescoFileID” in the “Ticket dynamic fields” drop-down) and use “XSLT” as a mapping for your outgoing data.
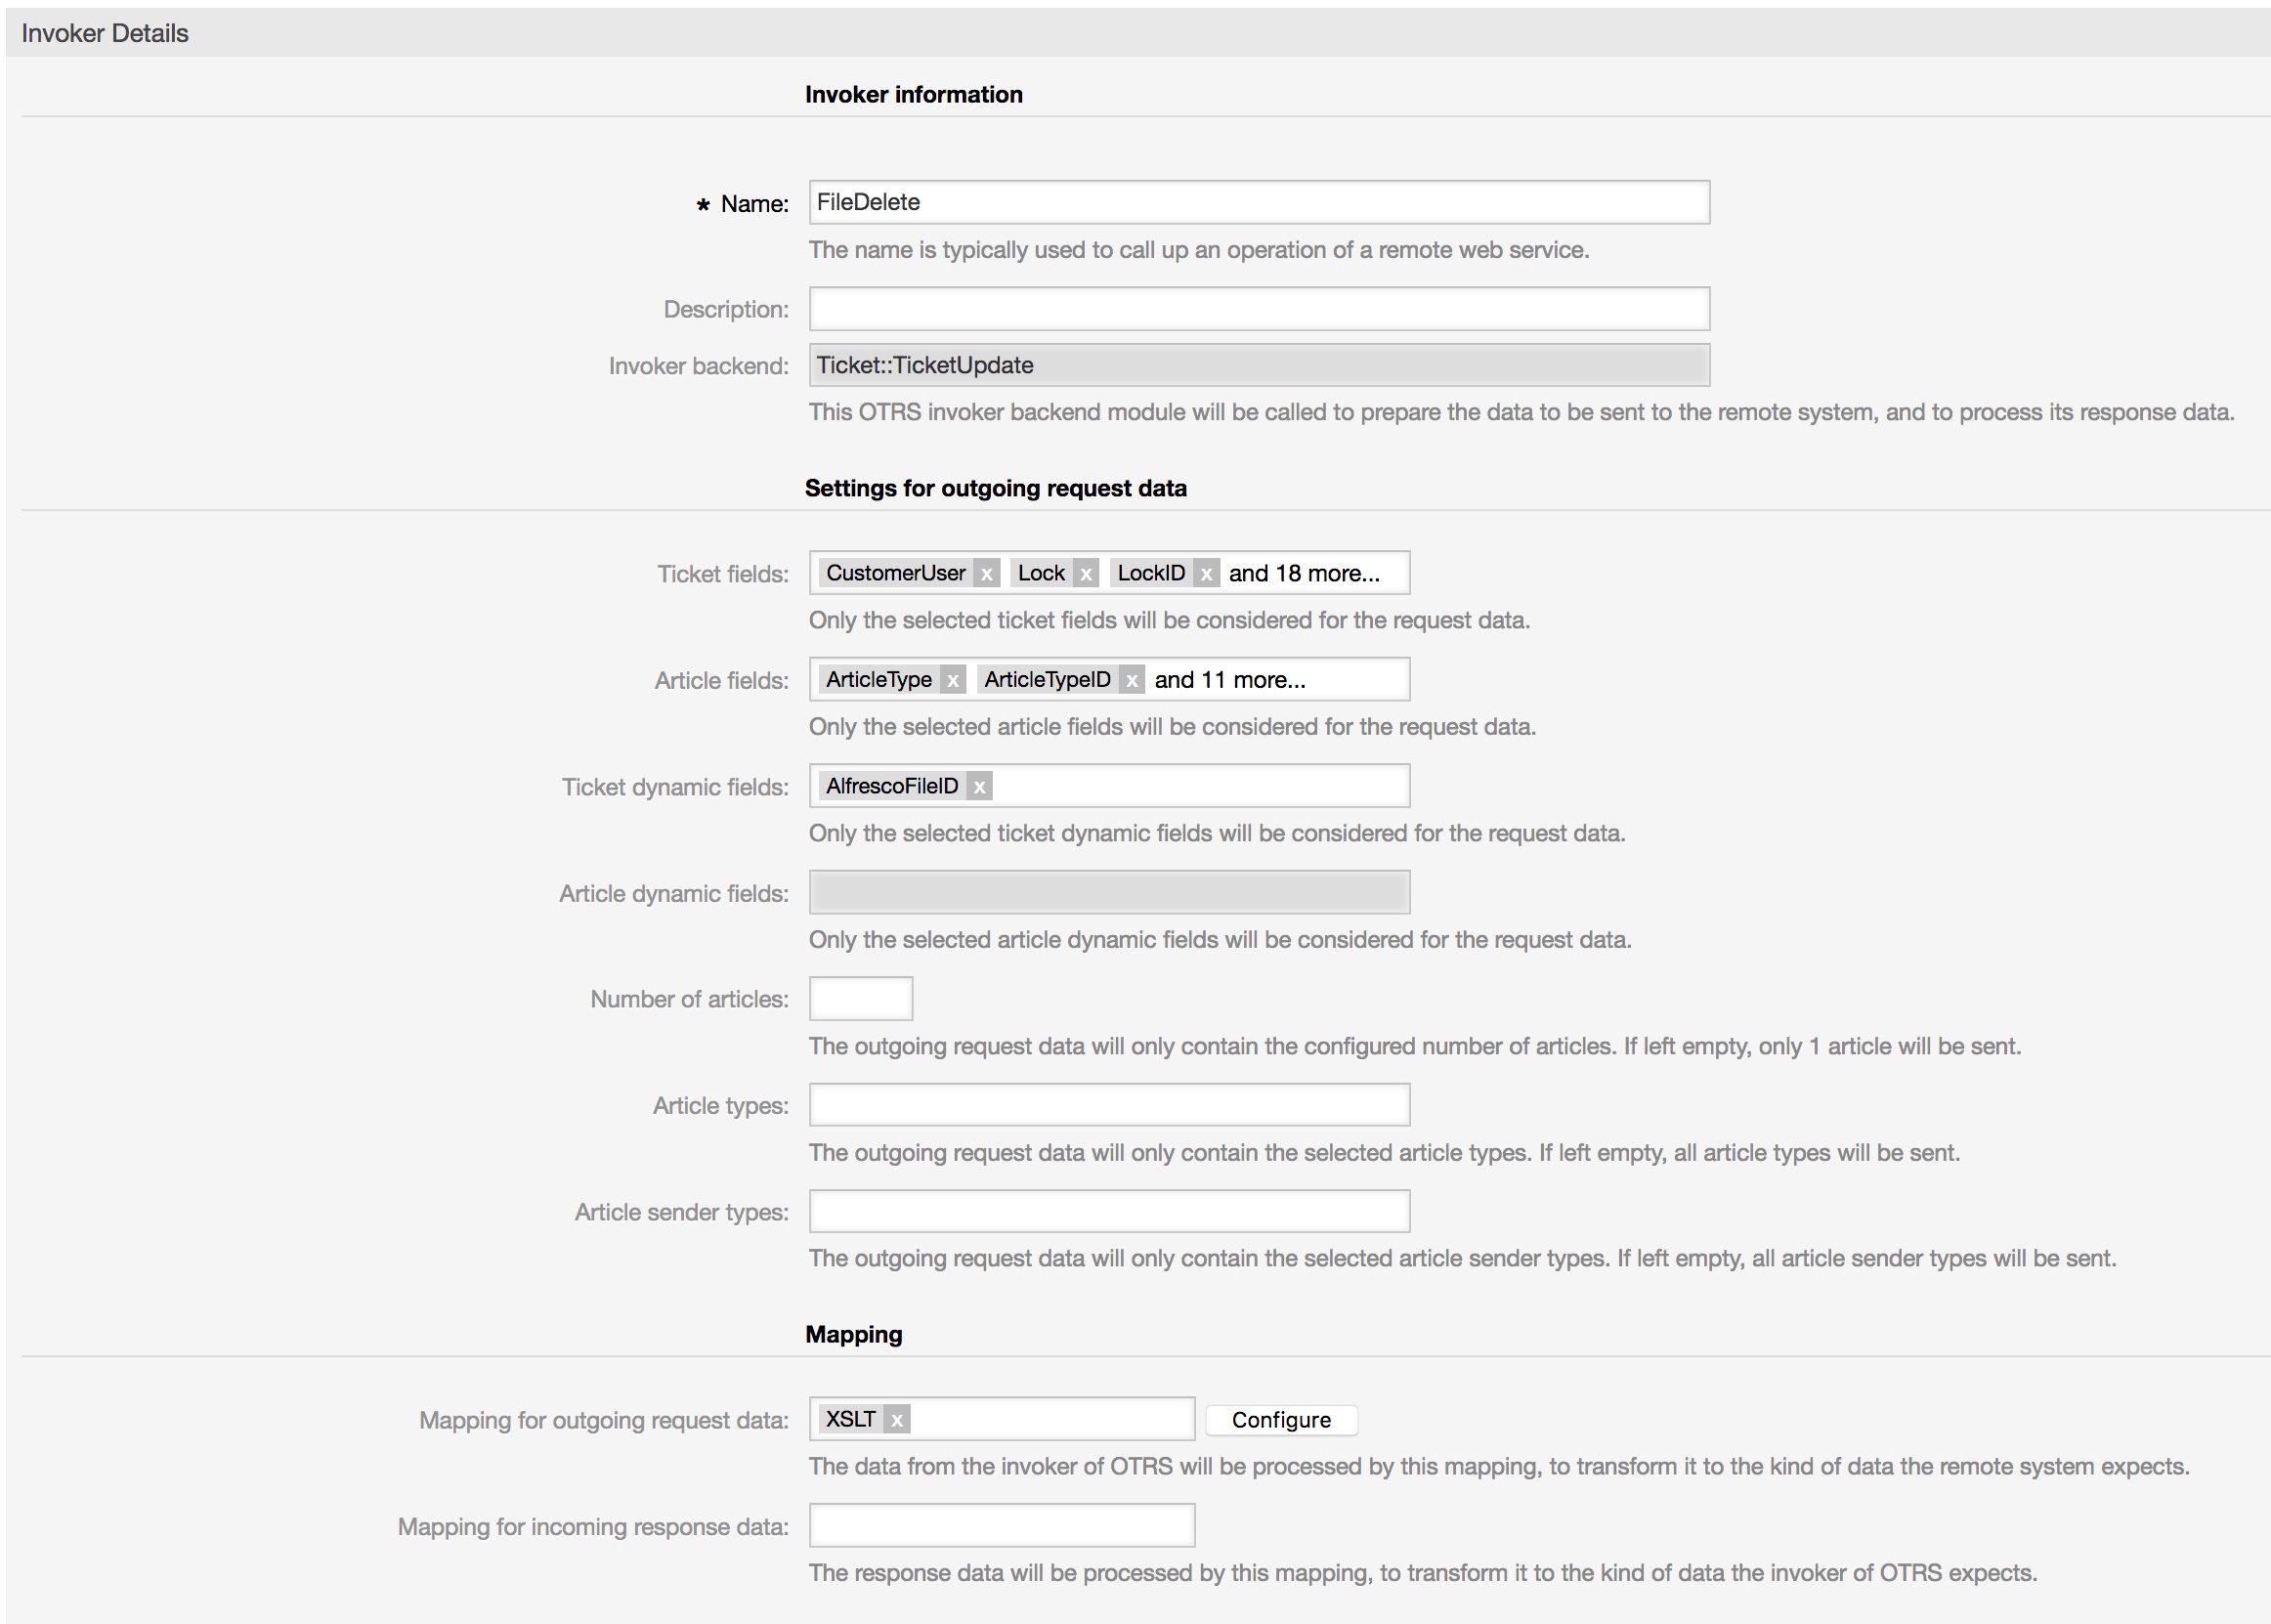
Use my example as outgoing XSLT-mapping:
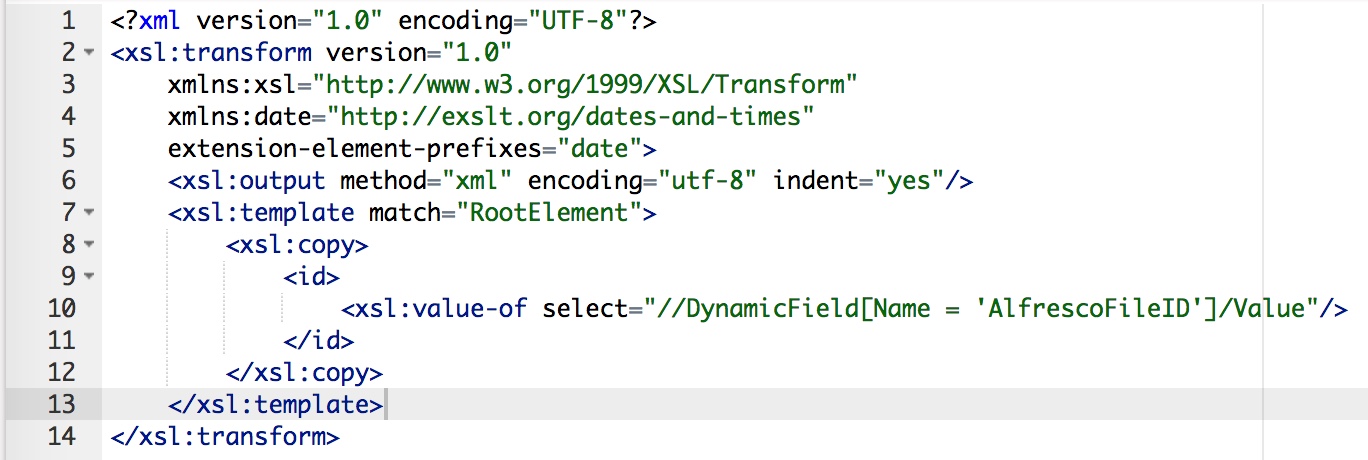
Because the answer is empty if it was successful, you don’t need a mapping for the incoming response data.
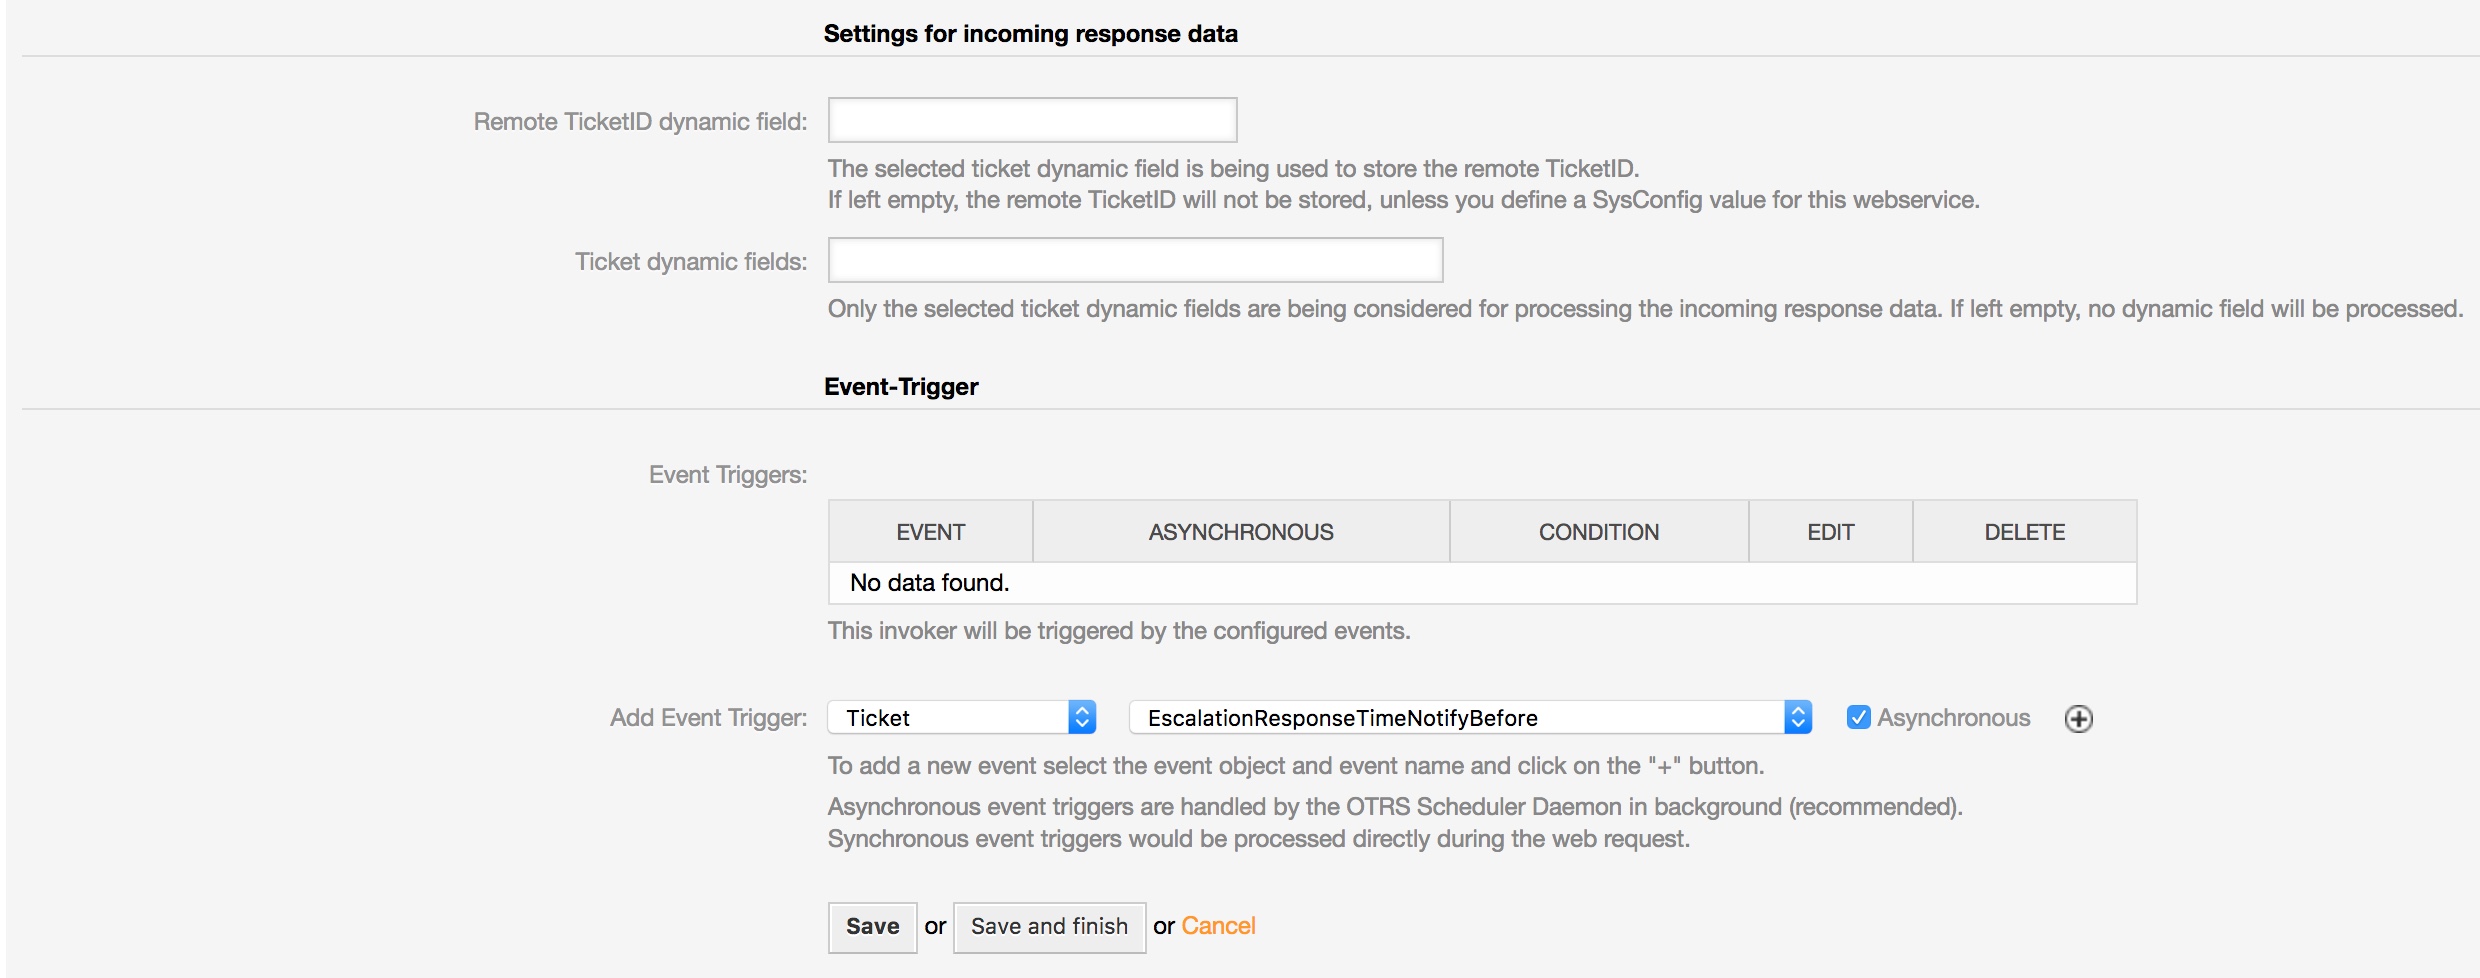
Furthermore, you need an “Event trigger”. Select a trigger of your choice and you’re done with the last Invoker of my tutorial.
Configuring the AlfrescoConnector “Network Transport”
Requester configuration
Furthermore, it’s necessary to configure the network transport for the Invokers because we’ve to use the right requests commands towards Alfresco. Otherwise, we’ll receive errors. It’s quite easy as you can see:
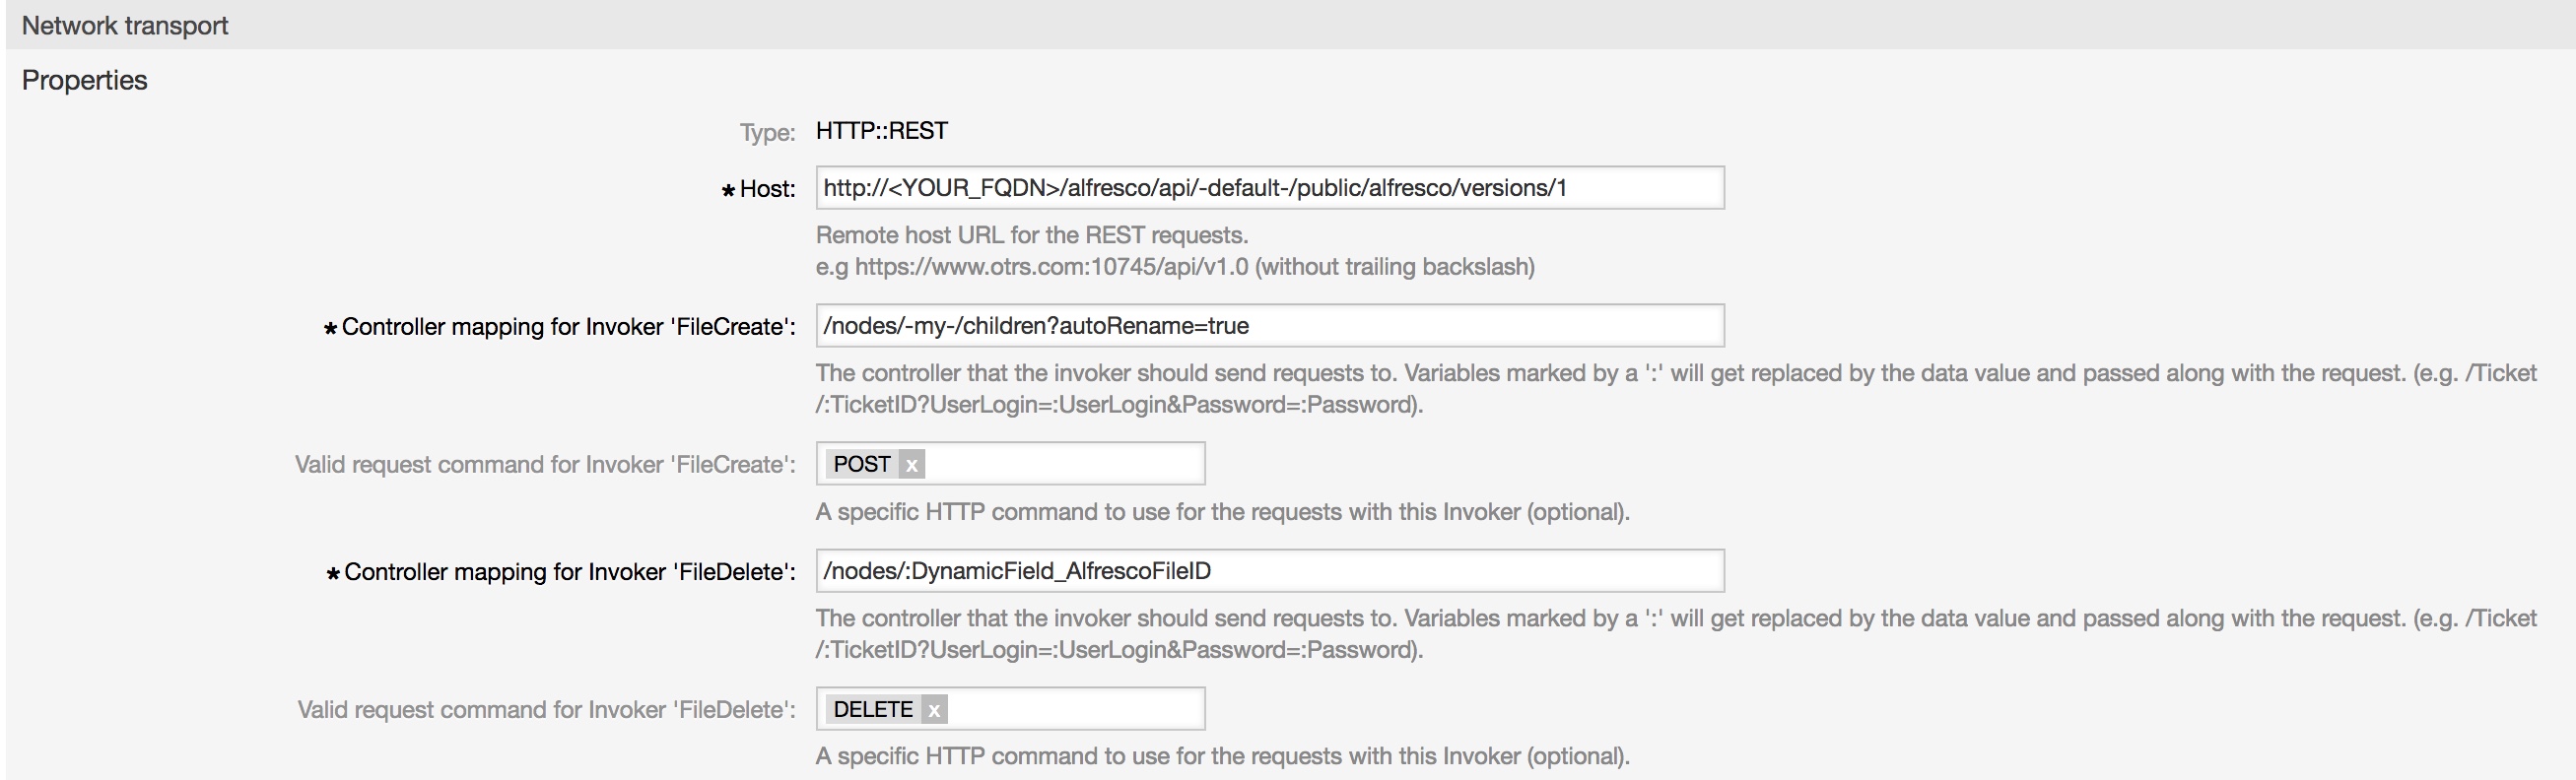
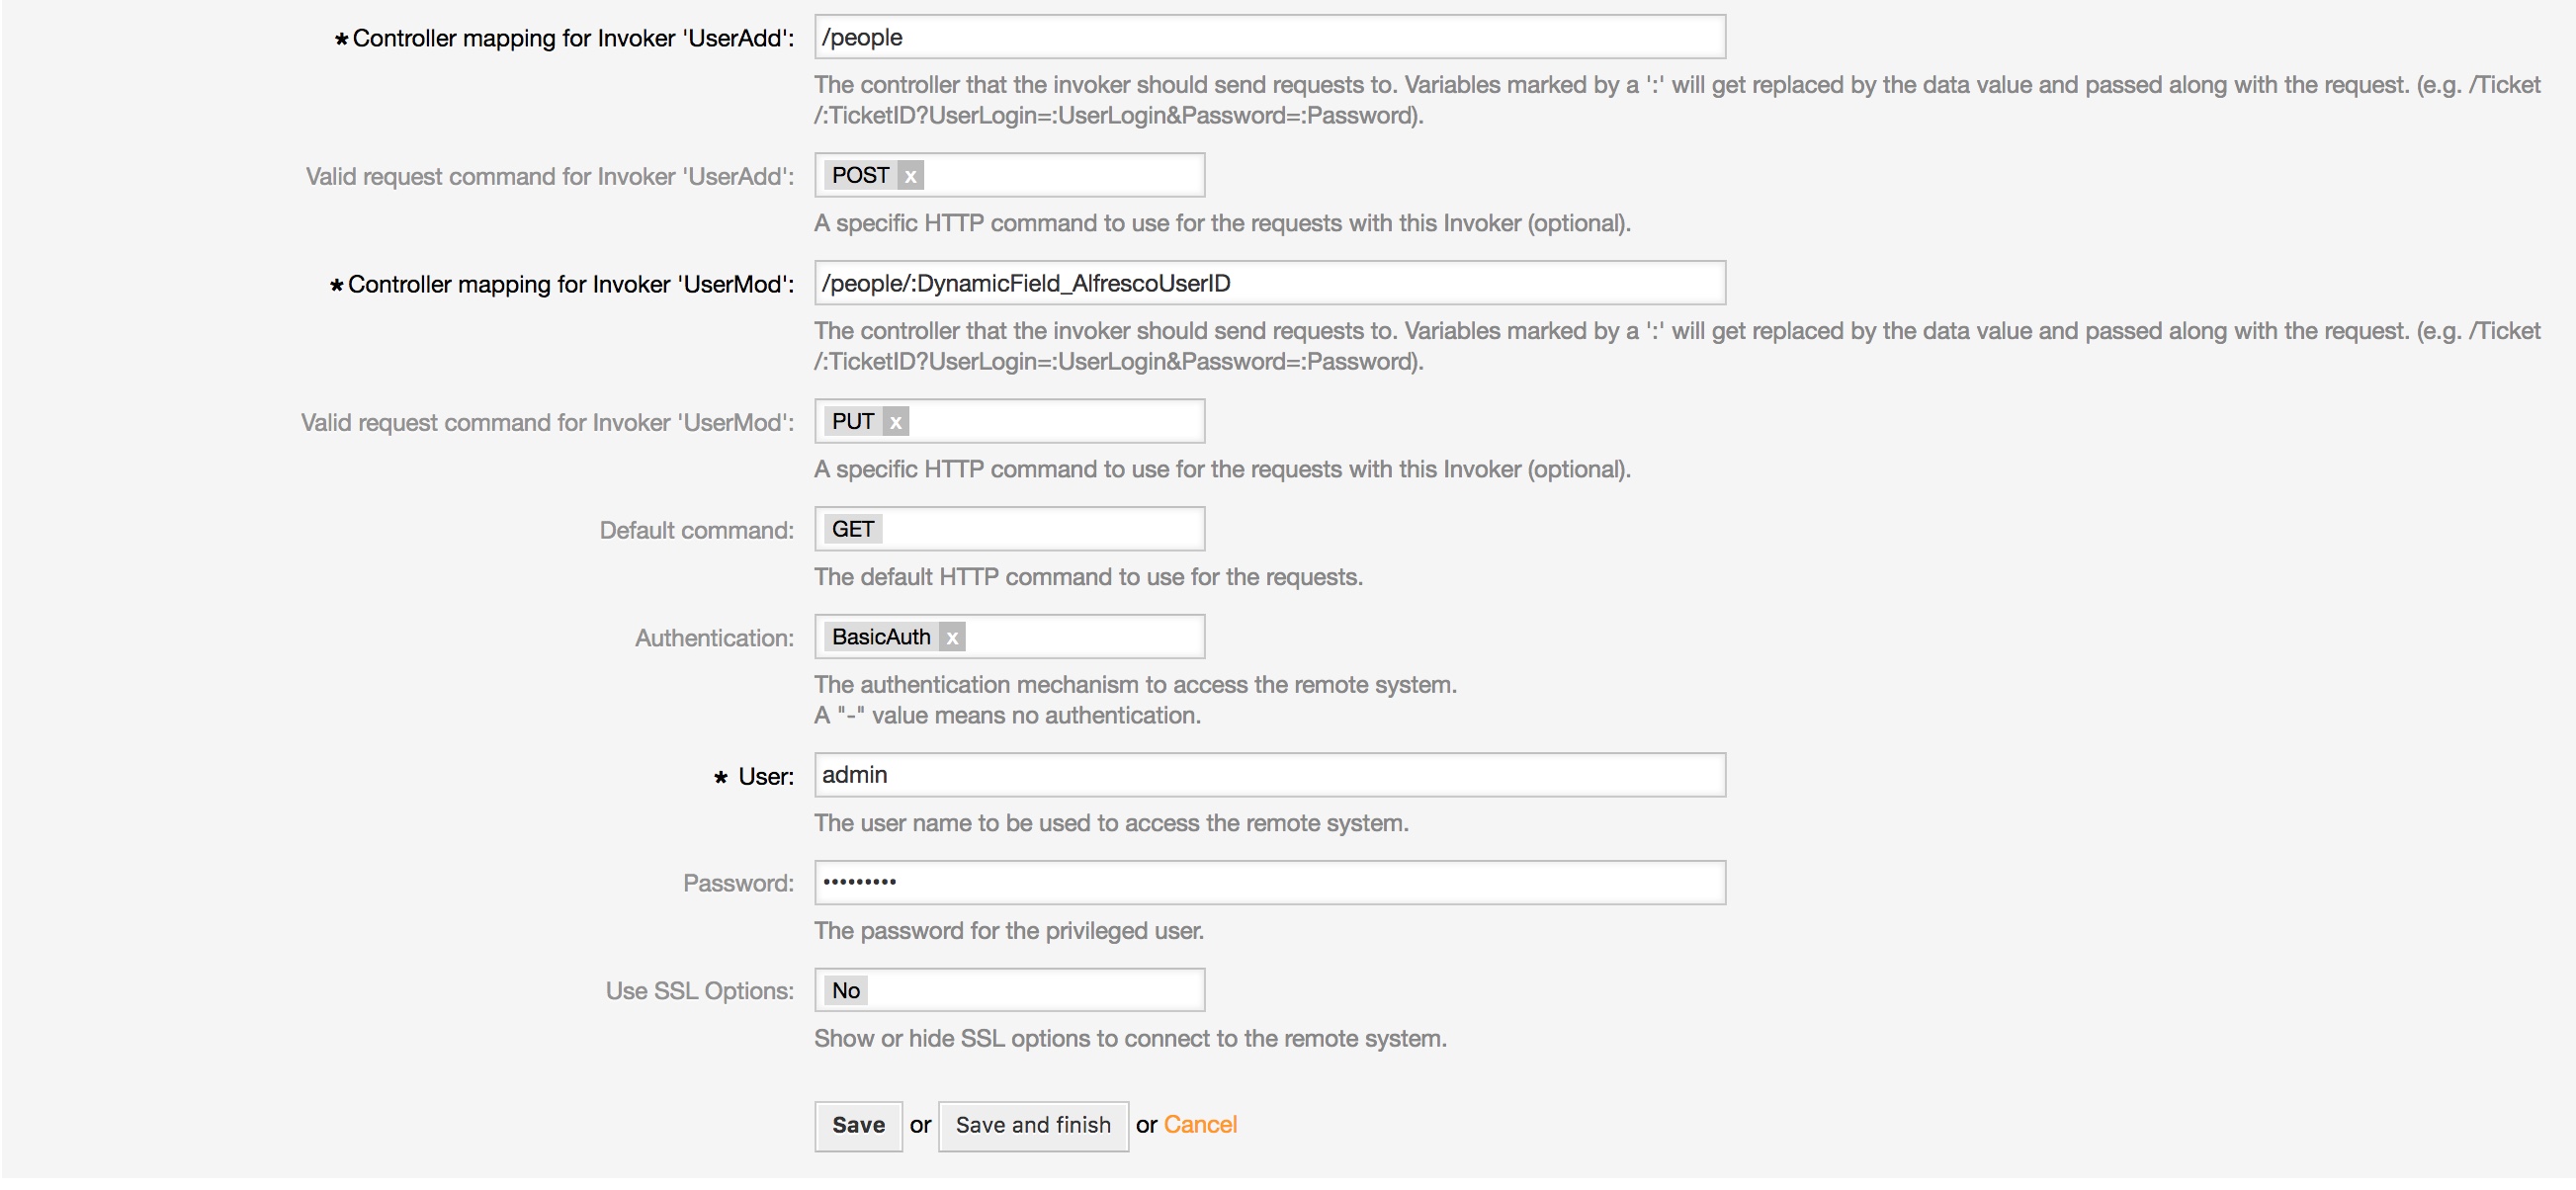
Please select “BasicAuth” for authentication and use a valid user.
Afterward just click on “Save and finish”.
Other AlfrescoConnector articles
Part 1 – Manage sites and folders – https://blog.otrs.com/2017/10/06/alfrescoconnector-part1/
Next time
In the next blog article for the AlfrescoConnector, I’ll show you how to upload files from OTRS to Alfresco via CMIS API.
More information about the Alfresco API
You can also use other resources which are provided by the Alfresco API.
If you need more information, please go to the following website: https://api-explorer.alfresco.com/api-explorer/